File compression is a common practice in Linux, where its users shrink files and directories using tools like Gzip to free up storage space and increase their system’s performance.
This compression technique also smooths out the process of sending files across networks – fast and efficient. But here’s the twist: when you need to use or change these compressed files, you wish they could return to their original, uncompressed state.
This is where the powerful command “Gunzip” steps in. It acts like a digital magician, letting you effortlessly restore files and directories with extensions like “.gz” or “.z” to their primary state with the previous file size and format.
Let’s dive into this article, where we’ll delve into the usage of the “gunzip” command with examples in Linux.
1. Use of the “gunzip” Command in Linux
Gunzip is a command-line utility designed for decompressing files that have been compressed using the GNU Zip (gzip) compression algorithm. It efficiently restores files with suffixes, such as, “-gz”, “.gz”, “.z”, “.taz”, “.tgz”, “_z”, “-z”, or “.Z” back to their initial/actual forms.
During this process, the compressed file is seamlessly replaced with its uncompressed version. While Gunzip can even compress a file or directory, it is primarily renowned for its proficiency in decompression tasks.
Let’s discuss the syntax of gunzip command.
$ gunzip [OPTION]... [FILE]...
The syntax of the “gunzip” command has two parts: Option and File.
The Option/Flag is used to change the conduct of the command whereas File is the representation of the input files that need to be decompressed. The flag or option comes with a hyphen after the “gunzip” command.
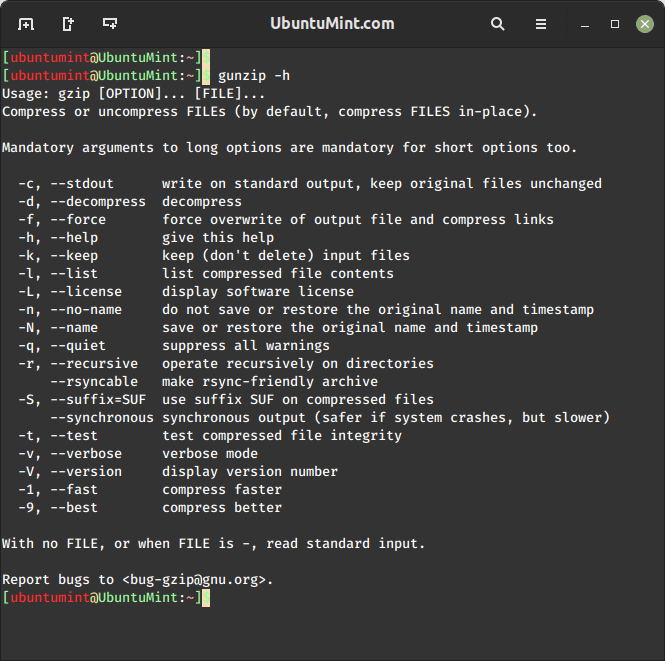
Run the 'gunzip -h' command in your terminal to view the available options of the ‘gunzip‘ command along with their explanations:
$ gunzip -h
These flags make it easy for a Linux user to perform compression and decompression in different cases.
2. Why Do We Use Gunzip?
Let’s discuss a few of the reasons why Linux users prefer the “gunzip” command for decompressing files and directories:
- The Gzip compression is a widely used and standardized compression format, making it compatible across different systems and platforms.
- The “gunzip” is used to decompress files that have been compressed using the gzip compression algorithm, which reduces the file size, making it more efficient for storage and data transfer.
- The compressed files are smaller in size, which means they can be transferred over networks more quickly.
- The compression not only saves space but also helps identify data corruption during transfer.
- The “gunzip” command proves to be very flexible due to the variety of flags that it offers.
- It can be integrated with many other Linux tools like tar etc, hence making it more convenient to use.
- The “gunzip” simplicity and consistent behavior make it ideal for scripting and automation purposes. Linux users often employ it within scripts and automated workflows to efficiently manage decompression tasks.
Moving ahead, now we will discuss some examples of the gunzip command to understand its usage.
3. How to Unzip (Open) Gz File
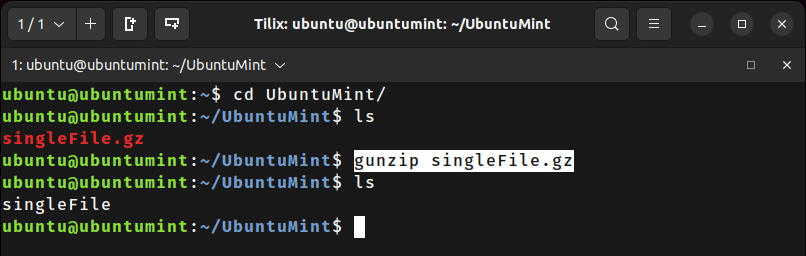
At times when you need to unzip a single file, just execute the command provided below:
$ gunzip singleFile.gz
This will decompress the “singleFile.gz” file and restore the original file named “singleFile”. To verify if your file is decompressed, simply execute the “ls” command.
4. How to Extract Multiple Gzip Files
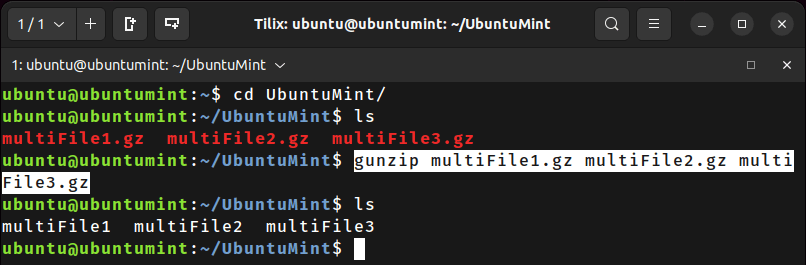
At times, you may need to decompress multiple files all at once by specifying the names of the .gz files you intend to decompress.
$ gunzip multiFile1.gz multiFile2.gz multiFile3.gz
This will decompress all three files (“multiFile1.gz”, “multiFile2.gz”, “multiFile3.gz”) and bring them to their previous corresponding decompressed states (“multiFile1”, “multiFile2”, “multiFile3”).
5. Force Decompress a Gz File
Sometimes, you may need to decompress a file while a decompressed file of the same name already exists in the directory. In such cases, a warning about file overwriting can arise.
To address this situation, the “gunzip” command provides the "-f" or "--force" flag, which empowers you to forcefully decompress the file with a ".gz" extension.
Note: The default behavior of the “gunzip” command is to replace the actual file. If you require to preserve/retain the actual file intact, you can combine the "-f" and "-k" flags.
For instance, to forcefully decompress the file “forceFile.gz” within a directory containing a file named “forceFile“, you can execute the mentioned command:
$ gunzip -f forceFile.gz
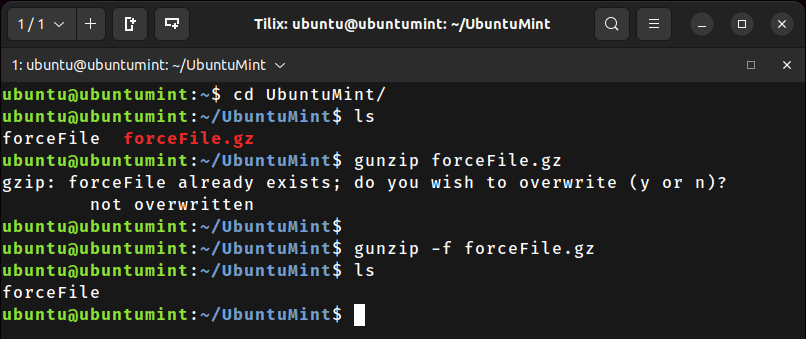
This command will effectively decompress the file “forceFile.gz” to “forceFile“, even if an existing “forceFile” file is present on your system.
6. How to Unzip a Gz File to a Directory
Until now you must have noticed that all the decompressed files resided in the same directory where their corresponding compressed files were located. This might have sparked the question:
“Can we decompress files directly into another directory or location?” The answer is yes, we can simply use the “-d” flag to decompress a file in another directory.
To do so, simply specify the path of the directory where you want to decompress the desired file, followed by the file’s name after the “-d” flag, as demonstrated below:
$ gunzip -d ~/to/Ubuntu/Mint/directory/file.gz
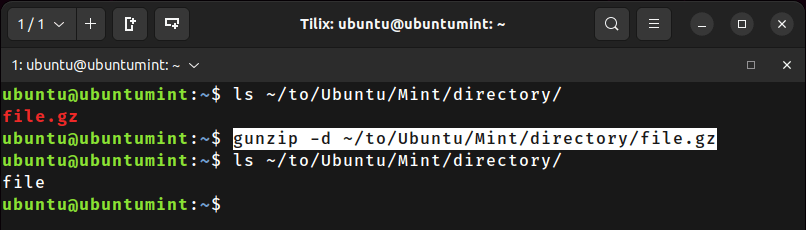
This will decompress the file “file.gz” in the “~/to/Ubuntu/Mint/directory” directory.
7. How to Unzip Gzip File While Keeping Original File
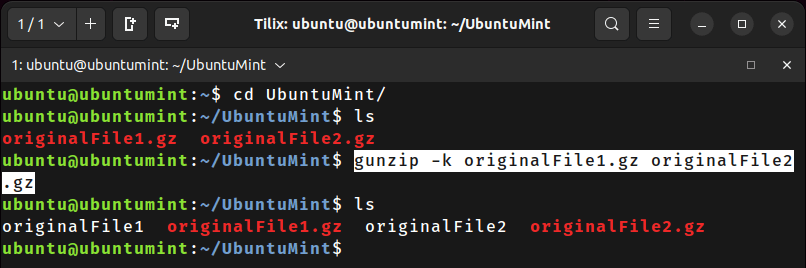
Consider a scenario where you want to send a compressed file to your friend and keep the decompressed file for yourself or vice versa. In either case, the objective is to retain both versions of the file in your system. For this purpose, the “gunzip” command offers the "-k" option.
To implement this approach, run the command stated below, which will decompress the files “originalFile1.gz” and “originalFile2.gz“, simultaneously redirecting the decompressed output to new files named “originalFile1” and “originalFile2“, all while retaining the compressed versions of the files:
$ gunzip -k originalFile1.gz originalFile2.gz
Executing this command will effectively decompress the specified files, creating new decompressed versions while retaining the original compressed files intact. To confirm the change, display all the files in the current directory.
8. How to Unzip Gzip File to Standard Output
Want to see the content of a compressed file but don’t want to decompress it? Well, no worries you can simply use the “-c” flag to view the text of the compressed file:
$ gunzip -c ubuntuMintFile.gz
This command will display the textual content of the file “ubuntuMintFile.gz”.
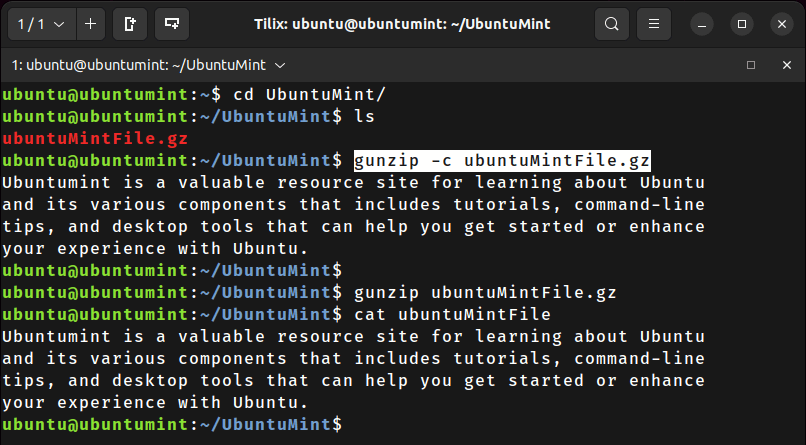
In the output below you can see that you get the same output by using the “-c” flag and by unzipping the file first and then using the cat command to read data from a file and display it on the console as output.
9. How to Check the Information of Gzip File
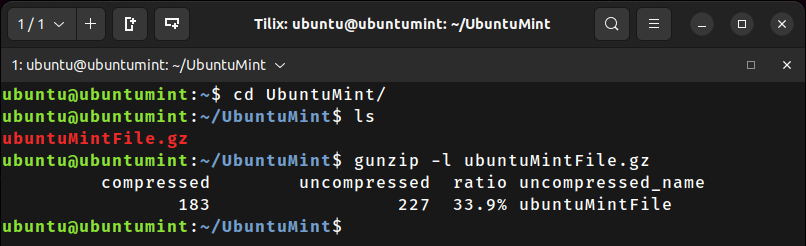
Being a Linux user, you might face a situation where you’ve compressed a file and you want to know the details about it. Ideally, you should be decompressing it before and then you might be able to get its details.
The “gunzip” command provides a “-l” flag which displays the information about the compressed file without necessitating its decompression. This information might be the size of the original file, the size of a compressed file, the name of the actual file, and the ratio of compression.
Let’s try it out by using a compressed file “ubuntuMintFile.gz”:
$ gunzip -l ubuntuMintFile.gz
This will display comprehensive information about the “ubuntuMintFile” file.
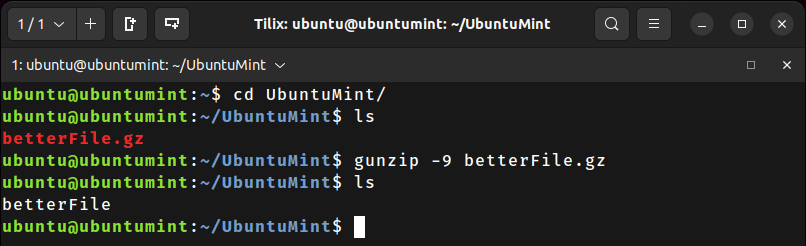
10. How to Decompress a Gzip File with Max Compression
There are instances when you’ll encounter a situation where the quality of the decompressed file takes precedence over the time consumed by the decompression process. In such instances, you can use the “-9” flag of the “gunzip” to achieve a higher-quality decompression, as demonstrated below:
$ gunzip -9 betterFile.gz
This command decompresses the file “betterFile.gz” in better quality but obviously will consume more time in the decompression process.
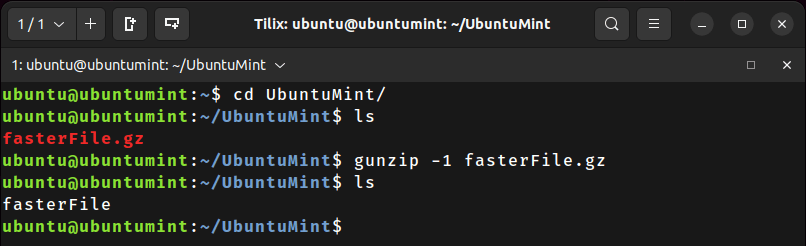
11. How to Decompress a Gzip File Faster
Likewise, you can even prefer speed over quality while uncompressing a file or directory. In this case, use the “-1” option followed by the filename that is to be decompressed.
$ gunzip -1 fasterFile.gz
This command extracts the file “fasterFile.gz” in a lesser time with a considerable speed.
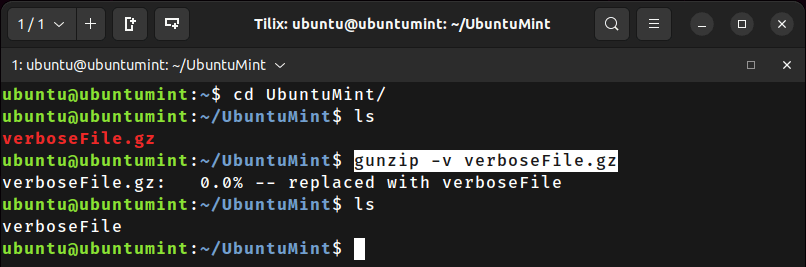
12. How to View Gzip Decompress Process
To decompress a file while receiving detailed feedback, the “gunzip” command provides the useful “-v” flag that displays the progress and details of the decompression process.
$ gunzip -v verboseFile.gz
Conclusion
The “gunzip” command is one of the best algorithms used by Linux enthusiasts for file decompression. This guide covered various commands for decompressing files and directories using the “gunzip” utility that are compressed by the “gzip” command.