In today’s digital world, every user of information technology desires to enhance the security of their computer to secure their digital assets. For this purpose, passwords are utilized as a protective measure.
However, due to the escalating rates of cybercrime, these passwords require hashing, a process that transforms them into fixed-length strings of characters, making their modification unchangeable, which makes it difficult for hackers to crack/guess your password.
To fulfill this emerging demand, Linux offers an incredible command-line password hashing algorithm known as the “mkpasswd” command which stands out as a commonly utilized command.
This guide will cover the process of installing mkpasswd to generate encrypted password hashes or password-based encryption keys in Linux.
Install mkpasswd in Linux
The ‘mkpasswd‘ command is used to generate SHA-512 encrypted password hashes or password-based encryption keys to enhance the security of your Linux distribution.
To install mkpasswd on a Linux system, you can use the package manager specific to your distribution as shown.
$ sudo apt install whois        [On Debian, Ubuntu and Mint]
$ sudo yum install expect       [On RHEL/CentOS/Fedora and Rocky/AlmaLinux]
$ sudo emerge -a whois          [On Gentoo Linux]
$ sudo apk add mkpasswd         [On Alpine Linux]
$ sudo pacman -S whois          [On Arch Linux]
$ sudo zypper install whois     [On OpenSUSE]
Now that you’ve installed the “mkpasswd” command, let’s dive into the syntax of this incredible utility.
$ mkpasswd [OPTIONS]... [PASSWORD [SALT]]
Let’s break it down to get a better understanding:
- Options (also known as “flags”) – They are used to change the conduct/behavior of the command.
- Password – This indicates the password for which an encrypted hash is to be generated.
- Salt – This is an optional value utilized in the process of encryption to enhance the security of the password hash.
To create a password hash, we require the “Type”, “Password”, and “Salt” parameters. In case any of these parameters are missing:
- Type – Omitting the “type” parameter would lead to an error message. By using the
“mkpasswd --help”command, you can list the password hash types. - Password – If the “password” parameter is missing, the command will prompt the user to enter the password.
- Salt – If the “salt” parameter is omitted, a random one will be selected based on the Linux distribution you are using.
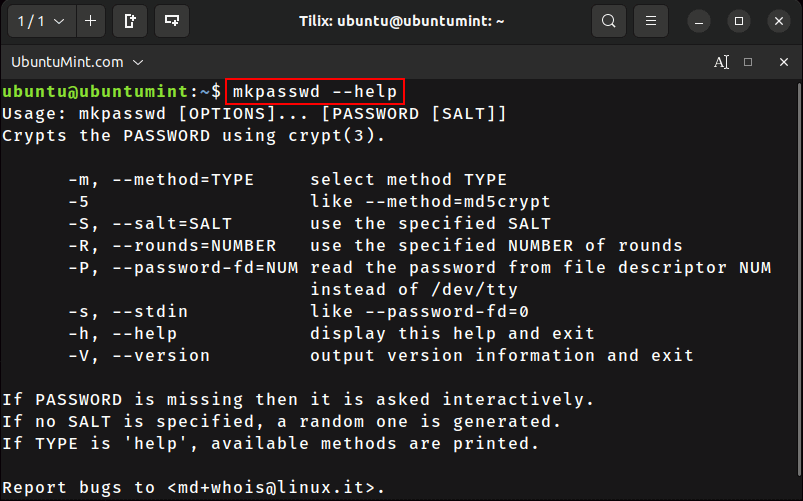
To see the brief introduction along with the options and usage, you can type.
$ mkpasswd --help
How to Generate MD5 Password Hash With a Salt
The MD5 algorithm (which stands for Message Digest Algorithm 5) is a cryptographic hash function utilized to produce a hash value of 128 bits (16 bytes).
To create a specified password hash with a designated salt, you can employ the '-m' flag for the hash and the '-S' flag to provide the salt.
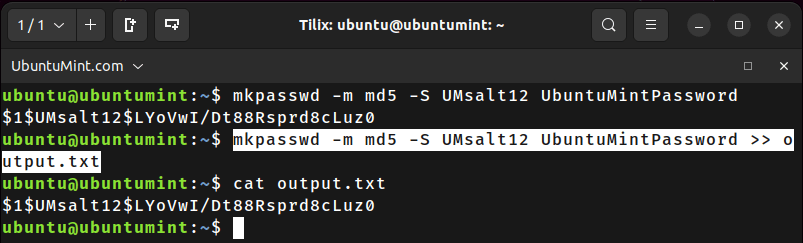
Let’s execute the stated command to create the MD5 password hash with “UMsalt12” salt, for the password “UbuntuMintPassword”.
$ mkpasswd -m md5 -S UMsalt12 UbuntuMintPassword

$1$UMsalt12$LYoVwI/Dt88Rsprd8cLuz0
How to Save Generated Hash in a File
In scenarios where you wish to maintain a record of the generated password hashes, Linux offers a convenient way to automatically save them in a file on your system.
You can achieve this by using the right-angle brackets '>>' followed by the file’s name to redirect the password hashes into that file, as shown below:
$ mkpasswd -m md5 -S UMsalt12 UbuntuMintPassword >> output.txt
After executing this command, the generated password hashes will be appended to the “output.txt” file.
To view the content stored in the “output.txt” file, you can use the cat command as shown.
How to Generate SHA-256 Password Hash Without Salt
In some instances, you may not specify a particular salt for your hash. In this situation, Linux will automatically select a random salt value for your hash!
The random choice of the salt depends on the version of your Linux distribution. Hence, it varies from system to system. To achieve an unsystematic selection of a salt value, simply exclude the '-S' flag within the command.
To create an SHA-256 password hash for the password “UbuntuMintPassword” without explicitly indicating a salt, execute the following command:
$ mkpasswd -m sha-256 UbuntuMintPassword

$5$u/zuBxlm6$OmYdzOHokf98w.sdFmPdqQwlZcPqUL/ANqfzJVrDrN5
Note: The SHA-256 is a cryptographic hashing function that takes an input of variable length and produces a 256-bit long hash output.
How to Generate SHA-256 Password Hash With Salt and Number of Rounds
Moving forward, let’s elevate your password security with an added layer of protection by generating an SHA-512 Password Hash. By specifying a salt and a designated number of rounds, you can enhance the strength of your password.
The more the number of rounds you specify, the more difficult it is for cyber criminals to crack your password! This is because the number of rounds directly impacts the time and computational resources required for hash computation.
Let’s execute this command to specify 1000 rounds using the '-R' flag, along with the “UMsalt12” salt and SHA-512 hash for the password “UbuntuMintPassword”.
$ mkpasswd -m sha-512 -S UMsalt12 -R 10000 UbuntuMintPassword

$6$rounds=10000$UMsalt12$2m9.IOfTMsRhrx7RnsM5Q9XWAVjWAjOrsOkTR22df..dghv7mIZj2HKvFFa5i2CwAEpjZGUQxgFN54aZU/wXh1
How to Generate SHA-256 Hash from Password File
Now let’s delve into passing an input string to generate a hashed password by utilizing the echo command to provide the input string “UbuntuMintPassword“.
Additionally, make use of the '-m' flag to specify the SHA-256 hashing algorithm, and include the '-s' flag, which instructs the command to read the password from the provided input:
$ echo "UbuntuMintPassword" | mkpasswd -m sha-256 -s

$5$mVri8h6d88$pa4APLvkxim0vlwolLsJo0A6oJP38WpFQBofIApQL01
How to Create MD5 Password Hash Using File Contents as Input
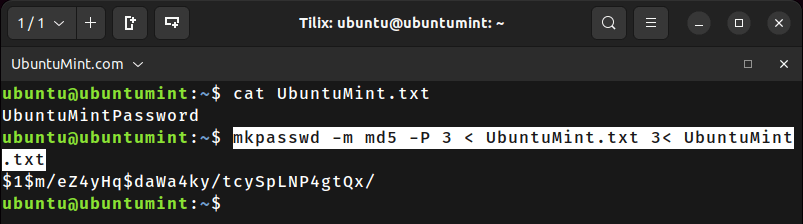
Next, let’s use the contents of a file as input to create an MD5 password hash and store the result in the same file.
In this context, we’ll work with the file named “UbuntuMint.txt” which provides the contents of file to the “mkpasswd” command using the '-P 3' option defines that you read the password from file descriptor 3.
The '3< UbuntuMint.txt' establishes the connection between file descriptor 3 and the “UbuntuMint.txt” file:
$ mkpasswd -m md5 -P 3 < UbuntuMint.txt 3< UbuntuMint.txt
How to Create a Hash Generator Bash Script
Finally, let’s streamline the password hash encryption process through automation. As the “mkpasswd” command facilitates you to make hash generators stored in a bash file.
All you’ll have to do is to call the file and the hash generator will start processing and you will be freed from the need of using the “mkpasswd” command again and again.
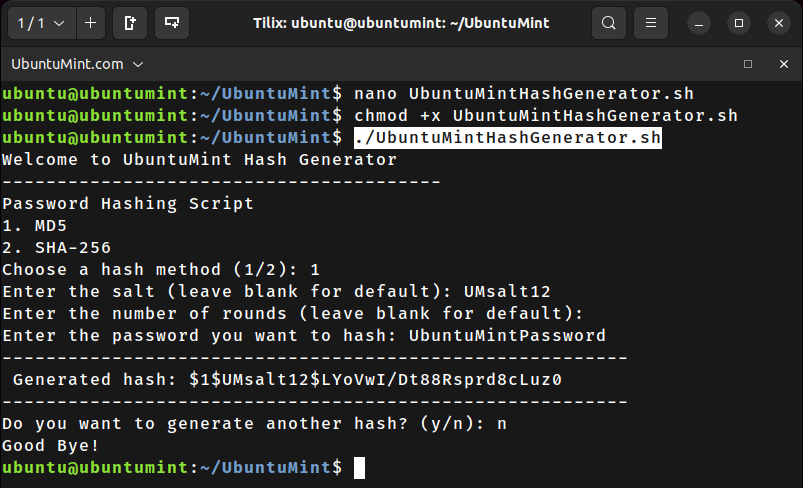
To do so, create a file named “UbuntuMintHashGenerator.sh” using the nano editor:
$ nano UbuntuMintHashGenerator.sh
Now copy and paste this code to your file.
#!/bin/bash

echo "Welcome to UbuntuMint Hash Generator"
echo "----------------------------------------"

generate_hash() {
	echo "Password Hashing Script"
	echo "1. MD5"
	echo "2. SHA-256"
	read -p "Choose a hash method (1/2): " method

	if [ "$method" == "1" ]; then
    	hash_method="md5"
	elif [ "$method" == "2" ]; then
    	hash_method="sha-256"
	else
    	echo "Invalid choice."
    	return
	fi

	read -p "Enter the salt (leave blank for default): " salt
	read -p "Enter the number of rounds (leave blank for default): " rounds

	read -p "Enter the password you want to hash: " password

	command="mkpasswd -m $hash_method"
	if [ ! -z "$salt" ]; then
    	command="$command -S $salt"
	fi
	if [ ! -z "$rounds" ]; then
    	command="$command -R $rounds"
	fi

	hash=$(echo "$password" | $command -s)
       echo "---------------------------------------------------------"
       echo " Generated hash: $hash"
       echo "---------------------------------------------------------"
}

while true; do
	generate_hash

	read -p "Do you want to generate another hash? (y/n): " choice
	if [ "$choice" != "y" ]; then
    	echo "Good Bye!"
    	break
	fi
done
Here is a brief explanation of what this bash script is doing:
- It firstly welcomes the user to Ubuntu Hash Generator.
- Then it asks the user about the password hashing script of his choice. Here we’ve given the option of MD5 and SHA-256.
- Furthermore, the user is asked to enter the desired salt and number of rounds (optional). If the user does not want to enter any salt or number of rounds, simply leave it blank.
- After this, the user will be asked to enter the password for which hash is to be generated.
- Now, after getting all inputs from the user, the hash will be generated and displayed on the console.
- Lastly, the script offers the user a choice: they can decide whether to generate a hash for another password or exit the program.
Save the file after pasting the code in it and exit by pressing the “CTRL + O” keys.
To make this script executable, you’ll need to use the chmod command to change its permission to .executable. After that, you can use the './' prefix followed by the respective file name to run the script.
$ chmod +x UbuntuMintHashGenerator.sh
$ ./UbuntuMintHashGenerator.sh
After the execution of the script, carefully follow the instructions provided by the script and input the necessary parameters to generate your desired password hash.
Conclusion
In today’s digital world, enhancing the security of personal information is a highly demanded desire of computer users. For this purpose, we hash passwords using different algorithms.
This guide provides comprehensive detail about the “mkpasswd” command in Linux which helps in hashing passwords to ensure their protection. We have also explored several examples to explain the use of this beneficial command.