Hello Debian users, are you looking to install the widely used LAMP Stack on your system? This will empower you to develop and deploy incredible websites.
If you’re interested, follow along with this comprehensive guide that outlines the installation process for LAMP on your Debian 12 system.
What is LAMP?
LAMP is a combination of four powerful open-source tools (Linux, Apache, MariaDB, PHP) which aid in building and hosting websites and applications.
Linux (Debian 12) is a free, open-source operating system, Apache serves as the web server, MariaDB is a powerful database server and PHP is the programming language.
Before MariaDB, MySQL was used in the LAMP stack. However, some people argue about using Python or Perl in place of PHP now.
Let’s initiate the process of LAMP Stack installation on a fresh Debian 12 installation.
Install Apache in Debian 12
Begin by executing the provided apt command to refresh the local package repository cache, which will update the package lists and upgrade any installed packages.
$ sudo apt update && sudo apt upgrade -y
With your repositories and packages now up-to-date, proceed to install the Apache web server from the official repository.
$ sudo apt install apache2* -y
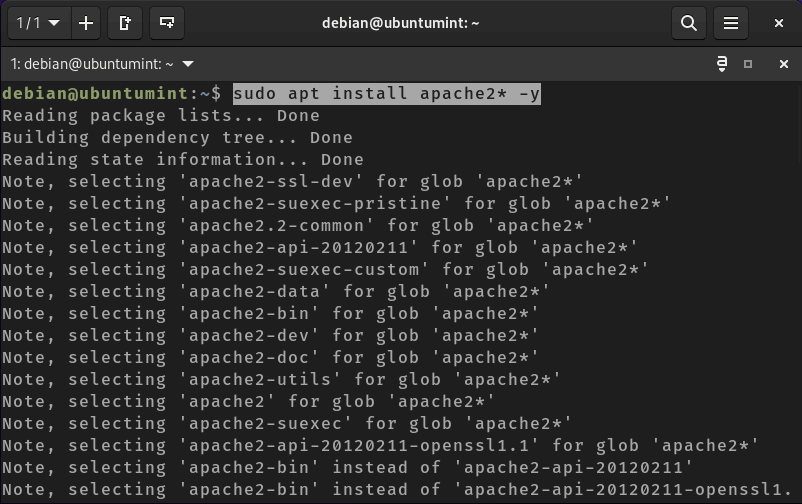
Now that Apache2 is installed on your system, verify its version by running the following command.
$ sudo apache2 -v

Server version: Apache/2.4.57 (Debian)
Server built:   2023-04-13T03:26:51
To initiate the service of your Apache2 web server, execute the ‘systemctl start‘ command provided below.
$ sudo systemctl start apache2
After initiating your web server service, you can also run the command to enable the Apache2 service to start automatically after a reboot.
$ sudo systemctl enable apache2
Moving forward, we can examine the status of the Apache2 service using the command below.
$ sudo systemctl status apache2

Next, you should configure your firewall to allow access to the Apache web server from any web browser.
$ sudo ufw allow 80
$ sudo ufw reload
Next, let’s check if our Apache2 server is running successfully. To do this, open any web browser and enter “http://localhost” in the address bar.
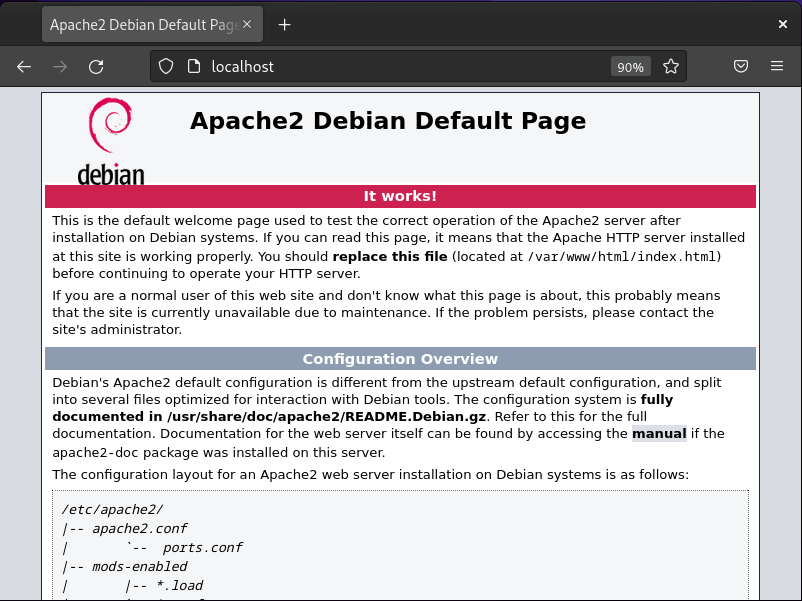
However, you can also access the Apache page by entering your server’s IP address or domain name.
http://your_server_ip/
OR
http://your_domain.com/
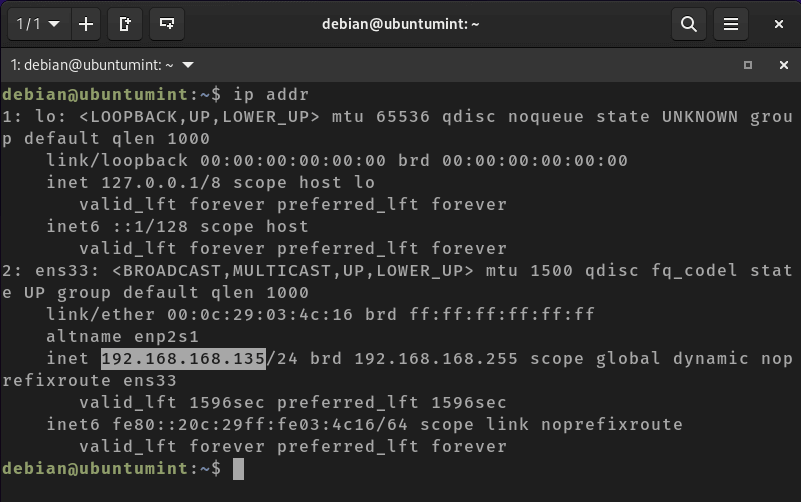
If you are unsure about your server’s IP address, run the ‘ip addr‘ command to locate it.
$ ip addr
Install MariaDB in Debian 12
MariaDB is a widely used, high-speed, open-source relational database system that assists users in storing and organizing their data.
To utilize the MariaDB database server, execute the provided command to install it.
$ sudo apt install mariadb-* -y
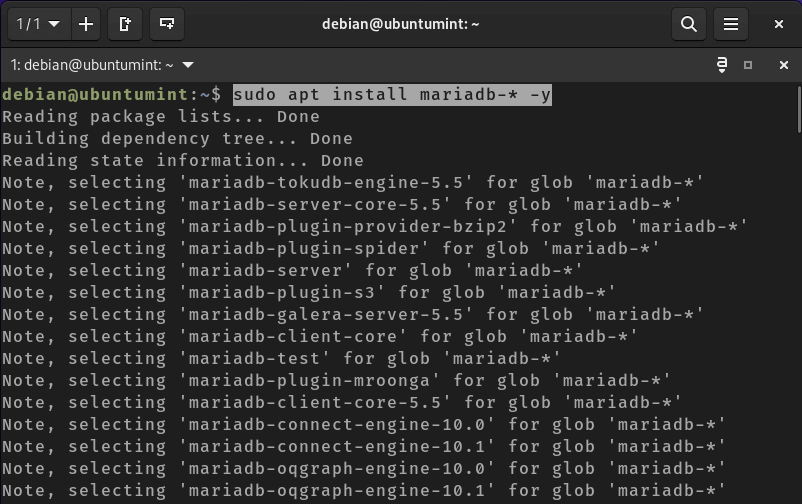
To view the version of the installed MariaDB server, type the following.
$ mariadb -V

mariadb  Ver 15.1 Distrib 10.11.3-MariaDB, for debian-linux-gnu (x86_64) using  EditLine wrapper
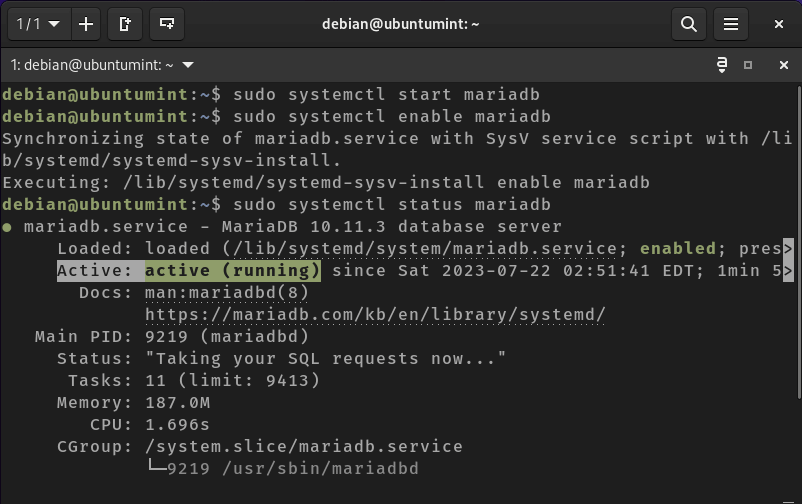
Next, initiate, enable, and verify the status of your MariaDB database server service.
$ sudo systemctl start mariadb
$ sudo systemctl enable mariadb
$ sudo systemctl status mariadb
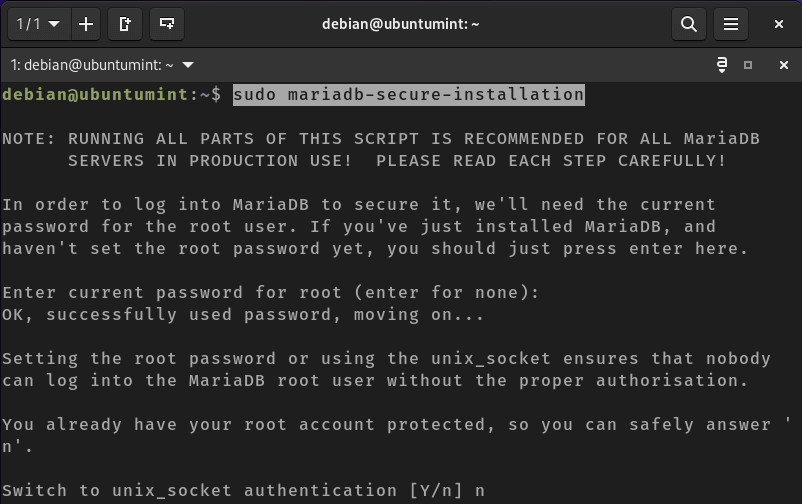
Lastly, we will run the following command to ensure the security of our database server.
$ sudo mariadb-secure-installation
Note: The primary aim of this command is to generate robust passwords, eliminate anonymous users and unnecessary databases, and disable remote logins. However, you can customize the security settings of your database according to your preferences.
The terminal will present various questions. Read and respond to them correctly.
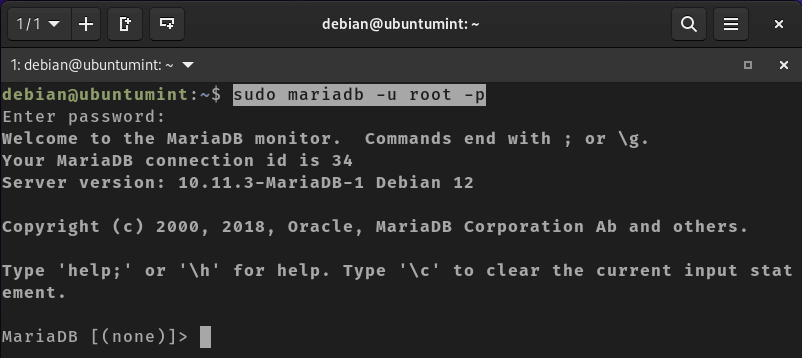
After securing your database, log in to it by executing the provided command. The terminal will request your password. Enter the password you previously set for your database to successfully access your database server.
$ sudo mariadb -u root -p
After successfully logging into your database server, you can create and manage your databases. Since we have already set up Linux and installed Apache and MariaDB, we can finalize our LAMP stack installation by adding PHP.
Install PHP, Perl, and Python in Debian 12
Although the ‘P‘ in the LAMP stack traditionally stands for the PHP programming language, there is an ongoing discussion about potentially replacing it with Perl or Python.
In this context, we will install PHP, Python, and Perl.
Install PHP in Debian
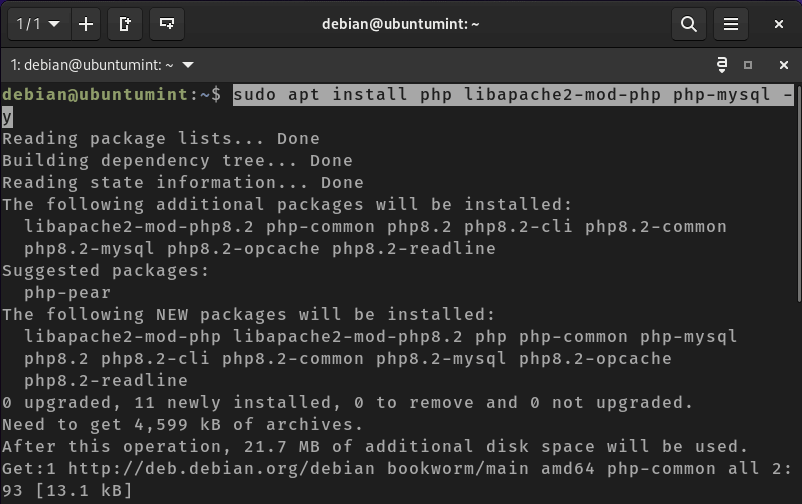
To install PHP, execute the command provided below.
$ sudo apt install php libapache2-mod-php php-mysql -y
After installing PHP, enter the command “php -v” to display the installed version.
$ php -v

PHP 8.2.7 (cli) (built: Jun  9 2023 19:37:27) (NTS)
Copyright (c) The PHP Group
Zend Engine v4.2.7, Copyright (c) Zend Technologies
	with Zend OPcache v8.2.7, Copyright (c), by Zend Technologies
Install Python in Debian
However, if you’re someone who wants to install Perl instead of PHP, the choice is yours. Simply run the following command to install Perl.
$ sudo apt install perl libapache2-mod-perl2 -y
To determine the installed version of Perl, execute the command.
$ perl -v

This is perl 5, version 36, subversion 0 (v5.36.0) built for x86_64-linux-gnu-thread-multi
Install Python in Debian
Continuing, let’s provide the command to install Python on your system, in case you wish to do so.
$ sudo apt install python3 libapache2-mod-python -y
To verify the installed version of Python3, enter the following command:
$ python3 --version

Python 3.11.2
With our LAMP stack now fully configured and operational, let’s assess its functionality by hosting a PHP website on it.
Check PHP Info on Debian
Begin by creating a PHP file named “ubuntumint_test.php” within the Apache2 directory using the nano editor.
$ sudo nano /var/www/html/ubuntumint_test.php
Next, add the following line to the file, which will display comprehensive information about the PHP installation and configuration.
<?php phpinfo(); ?>
Now, open a web browser and enter the following URL to view your successfully deployed webpage using the LAMP stack:
http://localhost/ubuntumint_test.php
OR
http://your_server_ip/ubuntumint_test.php
OR
http://your_domain.com/ubuntumint_test.php
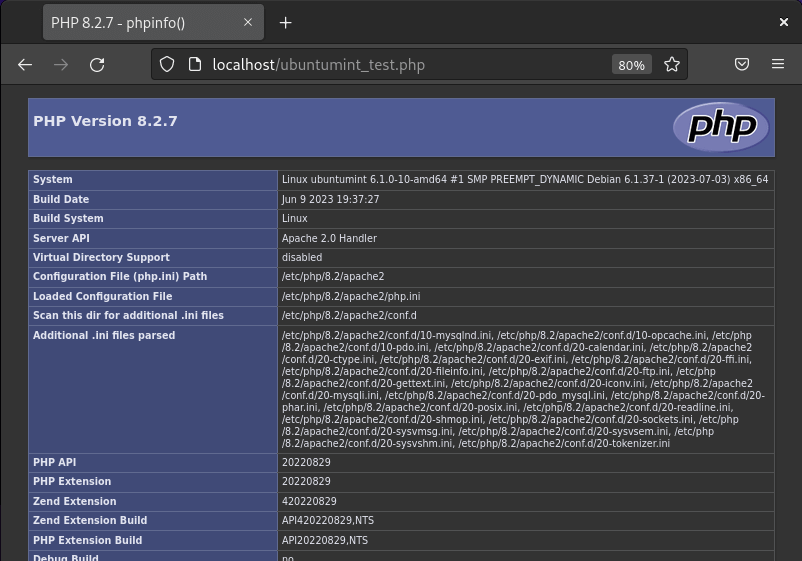
Here, we can observe that our sample website is hosted on an Apache web server. Continuing, we will thoroughly test the functionality of our LAMP Stack by creating a virtual host and deploying a PHP website on it, along with connecting to a MariaDB database.
Create a Virtual Hosting for a Website Using LAMP
Apache provides the capability to create virtual hosts, a feature that enables hosting multiple domains on a single server.
In Debian 12, the default configuration of Apache includes a server block designed to serve a single website, with its documents located in the “/var/www/html” directory.
However, if your intention is to host multiple websites on Apache, you can accomplish this by creating a new directory within the “/var/www/” directory using the “mkdir” command. This new directory should be named after your domain.
$ sudo mkdir /var/www/ubuntumint
Now that we’ve successfully created a directory named “ubuntumint”, let’s assign ownership of this directory to the “$USER” environment variable, as illustrated below.
$ sudo chown -R $USER:$USER /var/www/ubuntumint
Next, generate a new configuration file named “ubuntumint.conf” within the “sites-available” directory, which will guide Apache on how to handle the specified domain name:
$ sudo nano /etc/apache2/sites-available/ubuntumint.conf
In this new file, copy and paste the code provided below. Remember to modify the values of “ServerName”, “ServerAlias”, “DocumentRoot”, and “Directory” to match your domain settings:
<VirtualHost *:80>
    ServerName ubuntumint
    ServerAlias www.ubuntumint

    DocumentRoot /var/www/ubuntumint

    <Directory /var/www/ubuntumint>
        Options Indexes FollowSymLinks
        AllowOverride All
        Require all granted
    </Directory>

    ErrorLog ${APACHE_LOG_DIR}/error.log
    CustomLog ${APACHE_LOG_DIR}/access.log combined
</VirtualHost>
After saving this file, it’s time to enable the new virtual host.
$ sudo a2ensite ubuntumint
Since you’re now using a custom domain name, you might want to disable the default Apache website. To do so, execute the following command.
$ sudo a2dissite 000-default
Lastly, verify the integrity of your configuration file by utilizing the following command.
$ sudo apache2ctl configtest
Subsequently, execute the reload command to apply the changes to the Apache web server configurations:
$ sudo systemctl reload apache2
Let’s test this domain by moving the sample PHP file we previously created into our domain’s directory.
$ cp /var/www/html/ubuntumint_test.php /var/www/ubuntumint/
Now that you’ve established a domain for your website, you can access your website by entering the following URL into your web browser.
http://your_domain.com/ubuntumint_test.php
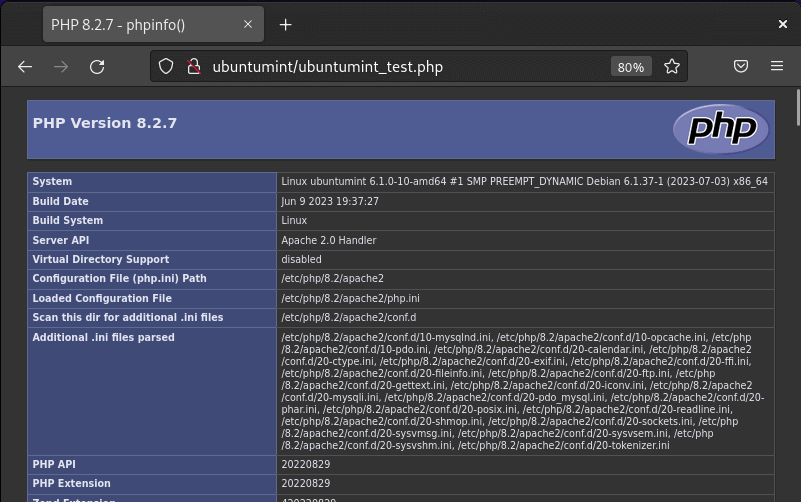
Observe that your website is successfully hosted on the custom domain instead of localhost. This demonstrates how to configure your Apache web server for hosting any website.
Host a Website on LAMP Stack
In this step, we will cover the configuration and testing of the MariaDB database server and PHP for website creation. Subsequently, we will proceed to host this website using the custom domain on the Apache web server.
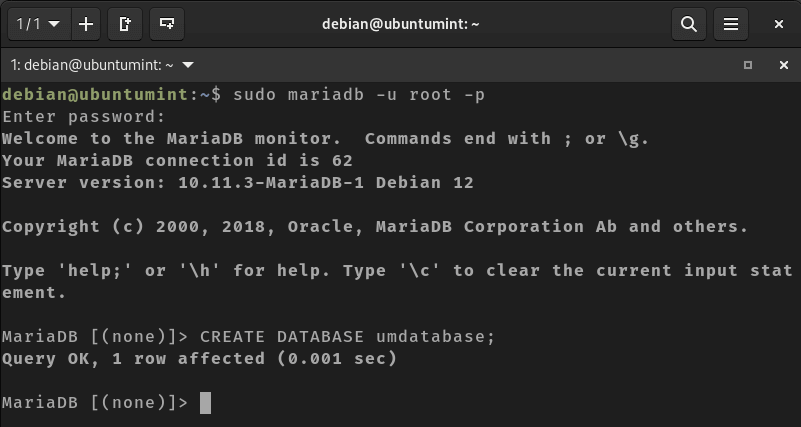
Now connect to the MariaDB database server and create a new database named “umdatabase”.
$ sudo mariadb -u root -p
$ CREATE DATABASE umdatabase;
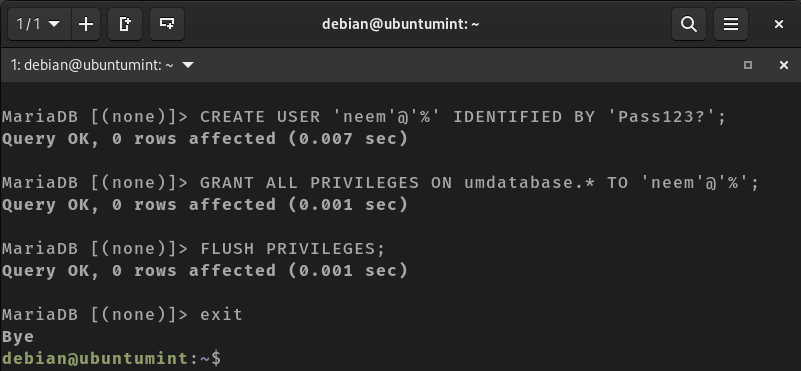
After successfully creating a new database, proceed to create a new user named “neem” for all databases and set its password as “Pass123?”. If you encounter any errors, consult MariaDB’s password policy for guidance.
CREATE USER 'neem'@'%' IDENTIFIED BY 'Pass123?';
Next, provide the necessary or all privileges to this user by executing the “GRANT” command:
GRANT ALL PRIVILEGES ON umdatabase.* TO 'neem'@'%';
After granting permissions, it’s necessary to reload the privileges by executing the following command:
FLUSH PRIVILEGES;
Continuing, let’s generate a new PHP file named “lampUser.php” in the domain’s directory using the nano editor.
$ sudo nano /var/www/ubuntumint/lampUser.php
In this file, copy and paste the code provided below to create a website capable of storing data in the MariaDB database. This code will establish a connection to the database and display an error message if any issues arise during the connection.
<?php
// Database connection parameters
$dbHost = "localhost"; // Replace with your database host
$dbUsername = "neem"; // Replace with your database username
$dbPassword = "Pass123?"; // Replace with your database password
$dbName = "umdatabase"; // Replace with your database name
// change your database connection parameters according to your system

// Create a database connection
$conn = new mysqli($dbHost, $dbUsername, $dbPassword, $dbName);

// Check if the connection was successful
if ($conn->connect_error) {
	die("Connection failed: " . $conn->connect_error);
}

// Create the 'UMusers' table if it doesn't exist
$sqlCreateTable = "CREATE TABLE IF NOT EXISTS UMusers (
	id INT(11) AUTO_INCREMENT PRIMARY KEY,
	first_name VARCHAR(50) NOT NULL,
	last_name VARCHAR(50)
)";

// Throw an exception if table does not create
if ($conn->query($sqlCreateTable) === FALSE) {
	echo "Error creating table: " . $conn->error;
	$conn->close();
	exit();
}

// Check if the form is submitted
if ($_SERVER["REQUEST_METHOD"] == "POST") {
	// Get the form data
	$firstName = $_POST["first_name"];
	$lastName = $_POST["last_name"];

	// Prepare and execute the SQL query to insert the data into the 'users' table
	$sqlInsert = "INSERT INTO UMusers (first_name, last_name) VALUES ('$firstName', '$lastName')";

	if ($conn->query($sqlInsert) === TRUE) {
    	echo "Data saved successfully!";
	} else {
    	echo "Error: " . $sqlInsert . "<br>" . $conn->error;
	}
}

// Close the database connection
$conn->close();
?>

<!DOCTYPE html>
<html>
<head>
	<title>UbuntuMint LAMP</title>
</head>
<body>
	<h1>UbuntuMint - LAMP Guide</h1>
	<form method="post" action="<?php echo $_SERVER["PHP_SELF"]; ?>">
    	<label for="first_name">First Name:</label>
    	<input type="text" id="first_name" name="first_name" required><br><br>

    	<label for="last_name">Last Name:</label>
    	<input type="text" id="last_name" name="last_name" required><br><br>

    	<input type="submit" value="Save">
	</form>
</body>
</html>
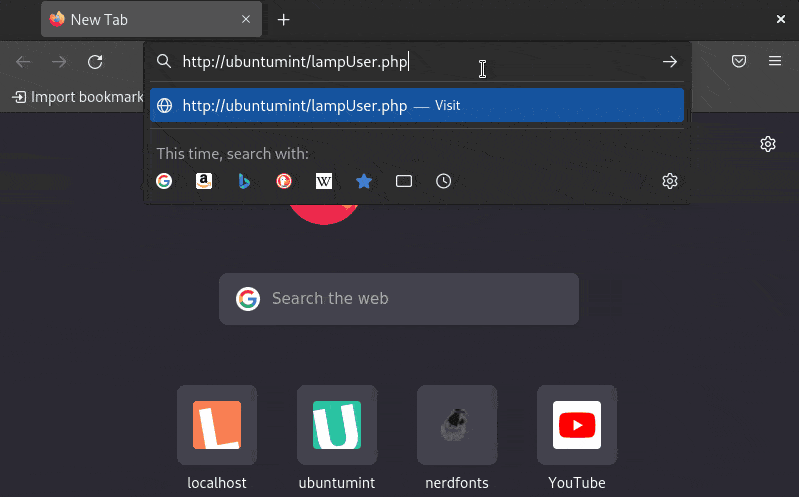
Save this file and open your web browser to test this PHP website, which can store data in the database table named “UMusers”.
http://your_domain/lampUser.php
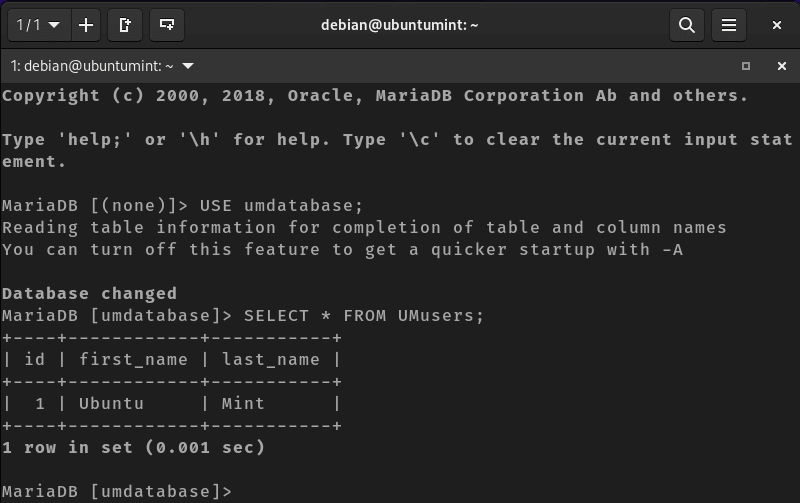
Let’s save some data using this website to verify if it will be stored in your MariaDB server or not.
$ sudo mariadb -u neem -p
USE umdatabase;
SELECT * FROM UMusers;
Conclusion
LAMP is a robust combination of four open-source tools that are essential for creating and hosting websites and applications. This article has presented a comprehensive guide for installing LAMP on Debian 12.
Hey, buddy!
You didn’t bother to mention that hosts file must be edited so that browsers could access this virtual host you’ve created. I wasted a couple of hours guessing what I’ve done wrong, and it turned out that you have done a bad job with missing this step. Update it.
@Belaz,
To fix this issue, you’ll need to edit the hosts file on your system and add an entry for the domain name associated with your virtual host.
Here’s how you can do it: