Ghost is a modern, open-source platform designed for creating professional blogs and websites. It’s built on Node.js and offers a sleek, intuitive interface for writing and publishing content.
Ghost is popular for its simplicity, speed, and built-in SEO features that allows users to create beautiful websites without needing extensive technical knowledge.
Prerequisites
Before starting, ensure you have:
- A server running Ubuntu 24.04 or later.
- A non-root user with sudo privileges.
- A domain name pointed to your Ubuntu server.
This guide will walk you through installing Ghost on your Ubuntu server and configuring Nginx (a popular web server) to host your blog.
Step 1: Point a Domain Name to Your Server
Log in to your server and use the ip command to find your Ubuntu server’s public IP address.
ip addr
This will display a list of network interfaces and their corresponding IP addresses. Look for the inet line next to the interface you are using (e.g., eth0 for wired connection, wlan0 for wireless).
Next, go to the website of the hosting company where you registered your domain name and add a new DNS record (A record) and point to the Ubuntu server’s public IP address.
After adding, wait for the DNS changes to propagate and make sure that your domain points to your server’s IP address. This process may take a few minutes, but it can also extend up to 24-48 hours.
Once these steps are completed, your domain name will be pointed to your server, ready for the Ghost installation.
Step 2: Install Required Dependencies
To install Ghost, you need to install a few dependencies such as Nginx, Node.js, NPM, and MySQL server, but before that you need to update the package lists from the repositories and then upgrade all installed packages to their latest versions.
sudo apt update && sudo apt upgrade -y
Next, install the required dependencies as shown.
sudo apt install nginx -y
curl -fsSL https://deb.nodesource.com/setup_20.x | sudo bash -
sudo apt-get install -y nodejs
sudo apt install mysql-server -y
Step 3: Create a MySQL Database for Ghost
Once mysql-server is installed, you need to secure your MySQL installation by setting up security options such as removing anonymous users, disallowing remote root login, removing the test database, and setting a password for the root user.
sudo mysql_secure_installation
Next, log into MySQL and create a database and user for Ghost.
CREATE DATABASE ghost_db;
CREATE USER 'ghost_user'@'localhost' IDENTIFIED BY 'your_password';
GRANT ALL PRIVILEGES ON ghost_db.* TO 'ghost_user'@'localhost';
FLUSH PRIVILEGES;
EXIT;
Step 4: Install Ghost-CLI on Ubuntu
Now install Ghost CLI, which will be installed globally, allowing you to use it to install, manage, and update Ghost blogs from the command line.
sudo npm install -g ghost-cli

Create a directory for Ghost and give it appropriate permissions:
sudo mkdir -p /var/www/ghost
sudo chown $USER:$USER /var/www/ghost
sudo chmod 775 /var/www/ghost
Navigate to the directory and install Ghost:
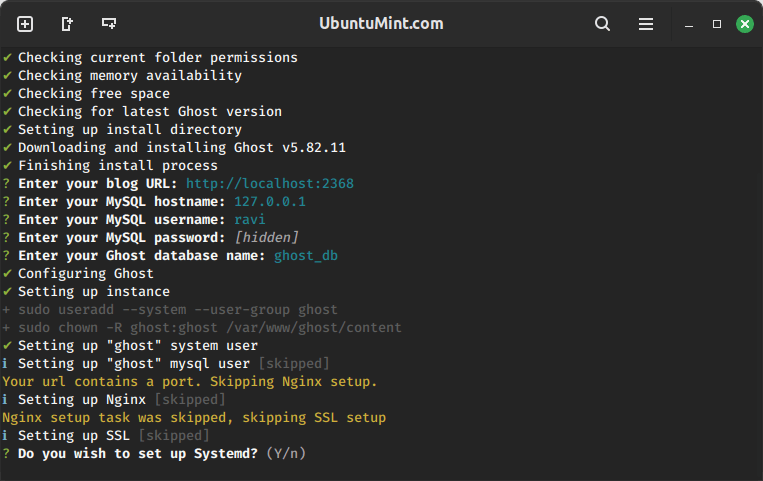
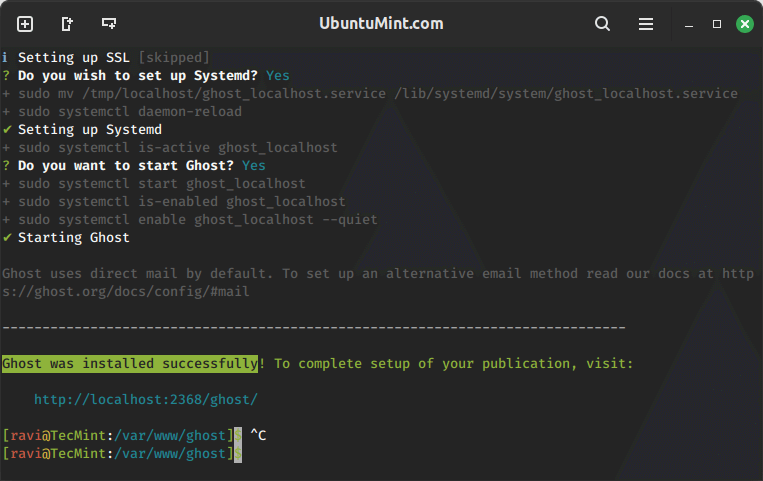
cd /var/www/ghost
ghost install

Follow the prompts to configure your site by providing your domain, and MySQL database details, and creating an admin user.
Step 4: Configure Nginx for Ghost
Create an Nginx configuration file for Ghost.
sudo nano /etc/nginx/sites-available/ghost
Add the following configuration, and make sure to replace your_domain.com with your actual domain name and adjust the proxy settings as needed for your specific setup in the server configuration file.
server {
    listen 80;
    server_name your_domain.com;
    location / {
        proxy_pass http://127.0.0.1:2368;
        proxy_set_header Host $host;
        proxy_set_header X-Real-IP $remote_addr;
        proxy_set_header X-Forwarded-For $proxy_add_x_forwarded_for;
        proxy_set_header X-Forwarded-Proto $scheme;
    }
}
Activate the configuration by creating a symbolic link.
sudo ln -s /etc/nginx/sites-available/ghost /etc/nginx/sites-enabled/
Test the Nginx configuration.
sudo nginx -t
If the test is successful, restart Nginx.
sudo systemctl restart nginx
Step 5: Secure Your Ghost Site with SSL
Now you need to secure your Ghost blog by installing Certbot, which is used to automate the process of obtaining and renewing SSL/TLS certificates for Nginx servers.
sudo apt install certbot python3-certbot-nginx -y
Obtain an SSL certificate.
sudo certbot --nginx -d your_domain.com
Follow the prompts to complete the installation.
Step 6: Access Your Ghost Blog
Now, you can access your Ghost blog by navigating to http://your_domain.com in your web browser.

To host a sample website, log in to the Ghost admin interface at http://your_domain.com/ghost and start setting up a new Ghost site.
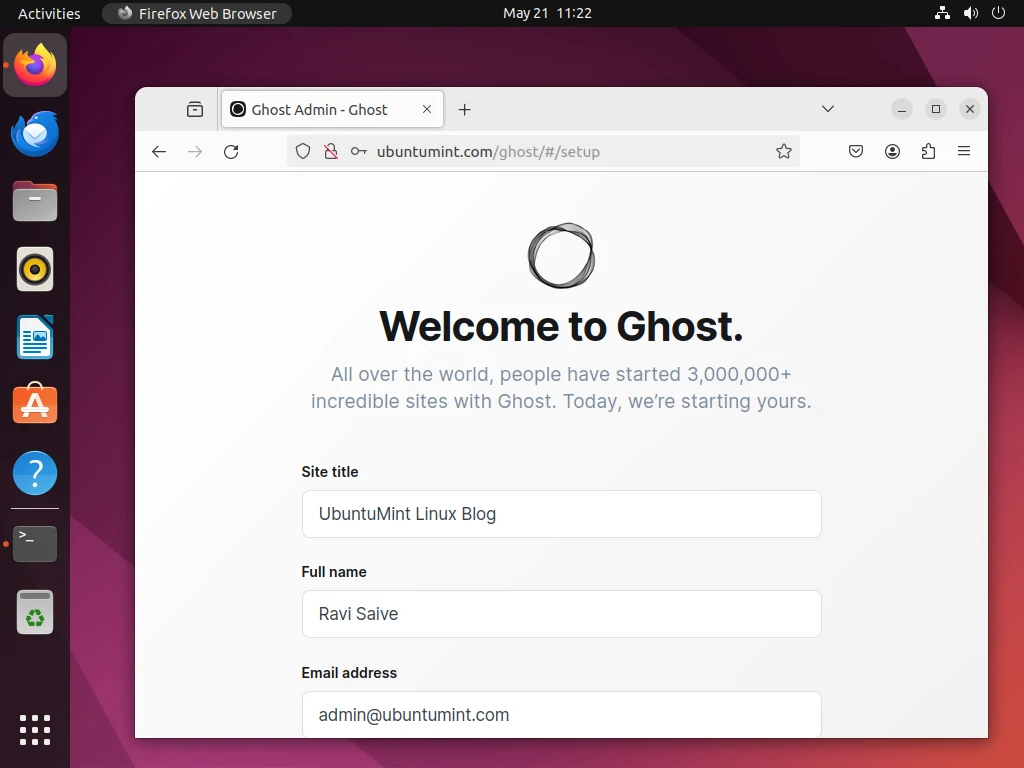
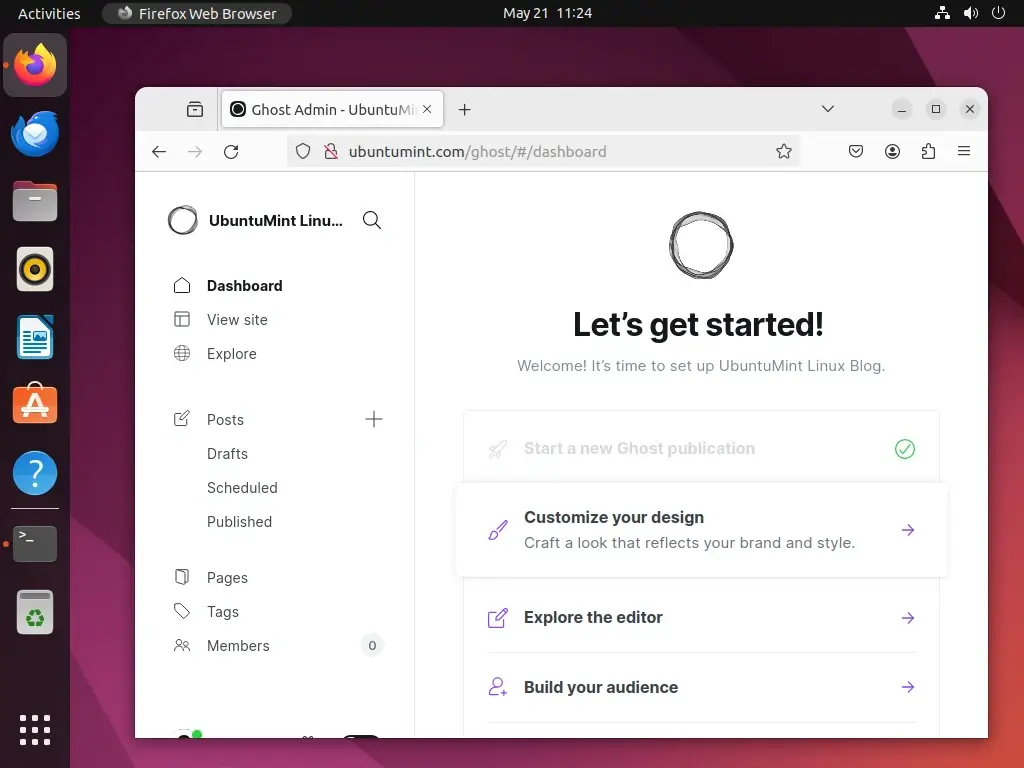
Once logged in:
- Navigate to the “Posts” section and create a new post to see how content creation works.
- Explore the “Settings” menu to customize your site’s appearance and functionality.
- Use themes to change the look of your website.
Conclusion
Congratulations! You have successfully installed and configured Ghost on Ubuntu with Nginx.
Your new Ghost blog is now live, and you can start publishing content right away. Ghost’s intuitive design and powerful features make it an excellent choice for creating a professional online presence.