If you’re a network administrator or a tech-savvy individual, you’re probably aware of the importance of having a static IP address. Unlike a dynamic IP address, which changes each time a device connects to the network, a static IP address remains fixed, making it easier to manage and access various network services.
In this blog post, we’ll guide you on how to set up a static IP address on Ubuntu distribution using three methods as follows.
1. Setting a Static IP in Ubuntu Desktop
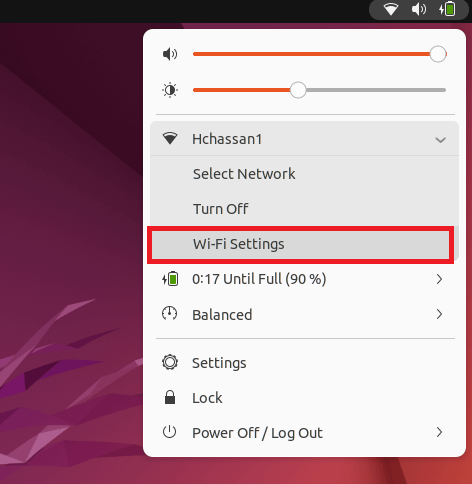
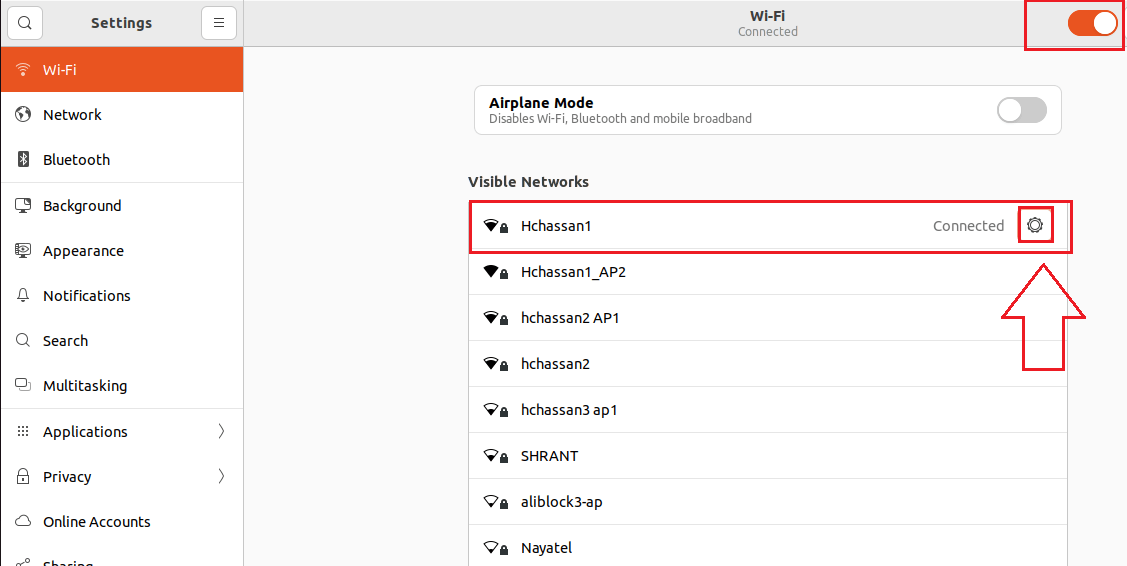
1. Open the network icon located at the top right corner of the desktop, click on it, and select the “Wi-Fi Settings” option from the dropdown menu:
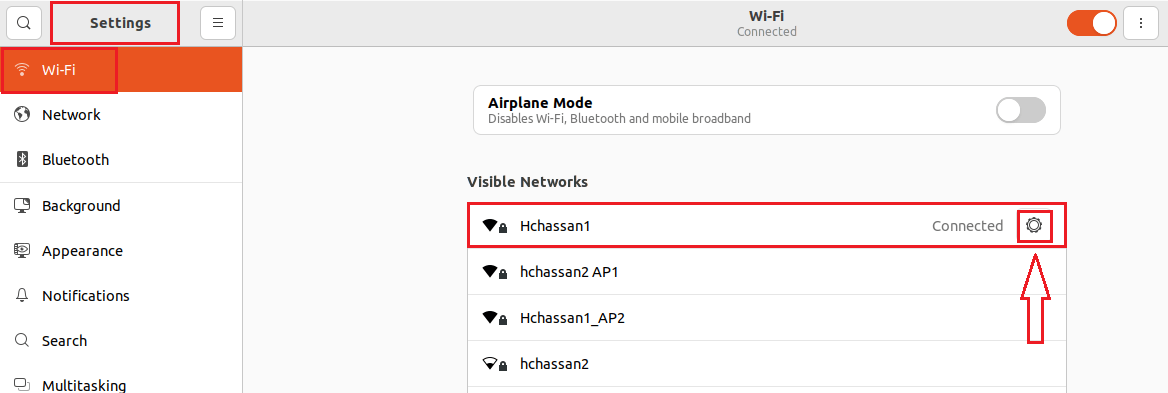
2. Once you have selected the “Wi-Fi Settings“, you will see a list of available wireless connections. To access the network information for a particular wireless connection, click on the gear icon located at the end of the corresponding connection box:
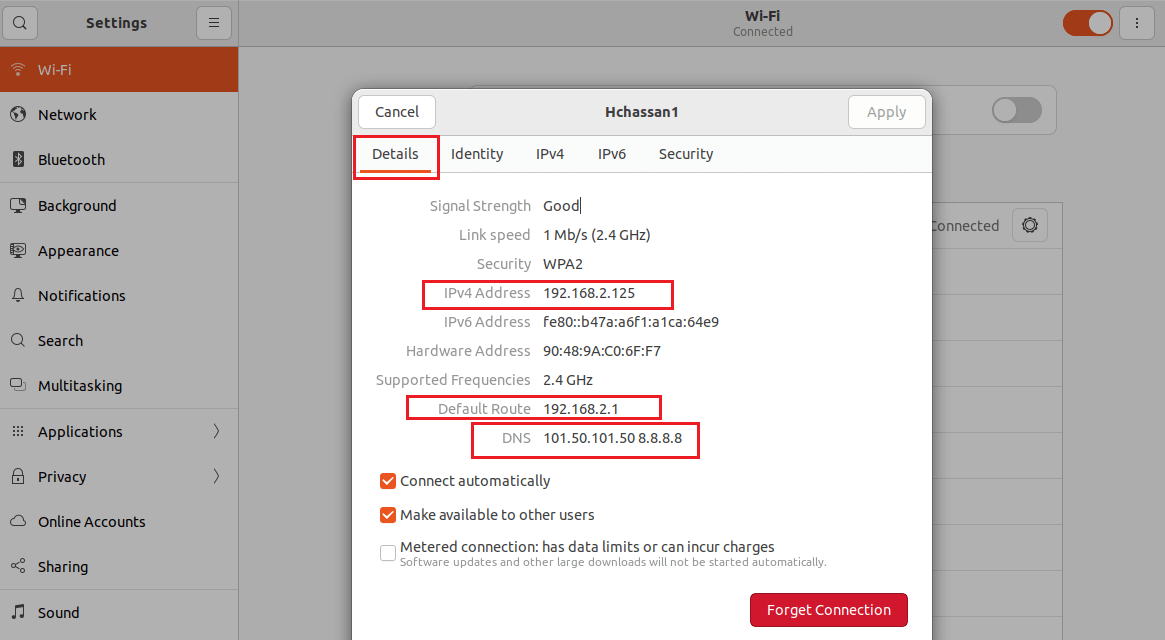
3. Upon clicking the gear icon, a new dialog box will appear with network information presented in different sections. To view the assigned default IP address for the wireless connection, navigate to the “Details” tab. Here, you will find the default IP address that has been assigned using DHCP, which is 192.168.2.125.
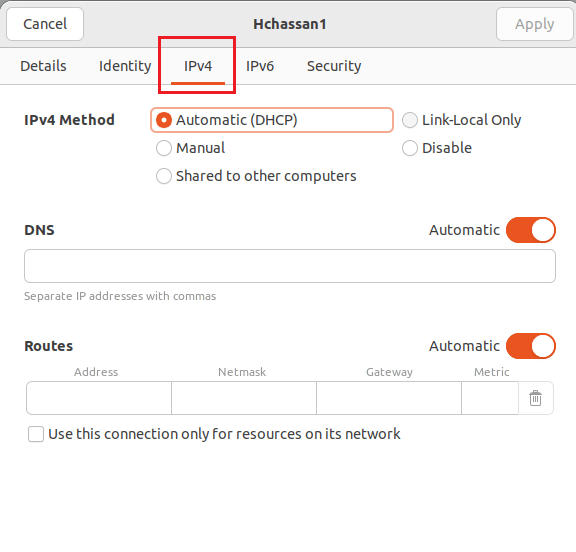
4. To view detailed information on IP assignment, navigate to the “IPv4” tab in the same dialog box. Here, you can find detailed information on how the default IP address has been assigned to the Ubuntu operating system through DHCP:
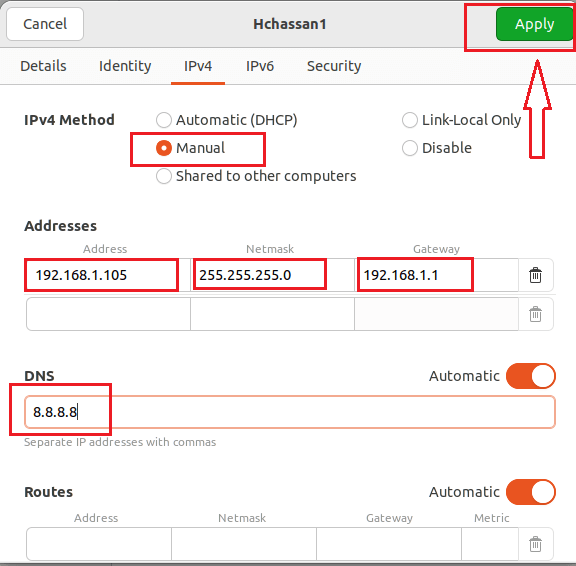
5. Next, select the “Manual” option in the IPv4 tab and enter the following details:
Static IP address: 192.168.1.105
Netmask: 255.255.255.0
Gateway: 192.168.1.1
DNS: 8.8.8.8
Finally, click on the “Apply” button located at the top right side of the dialog box to save the changes.
6. After setting the static IP address, it’s important to verify that the changes have been applied correctly. To do this, you will need to restart the network by clicking the switch button to ON/OFF network located at the top right corner of the screen. Once the network has been restarted, click on the gear icon to display the network details.
7. After restarting the network and accessing the network details, you should see the network configuration that was performed manually in Ubuntu displayed in the “Details” section.
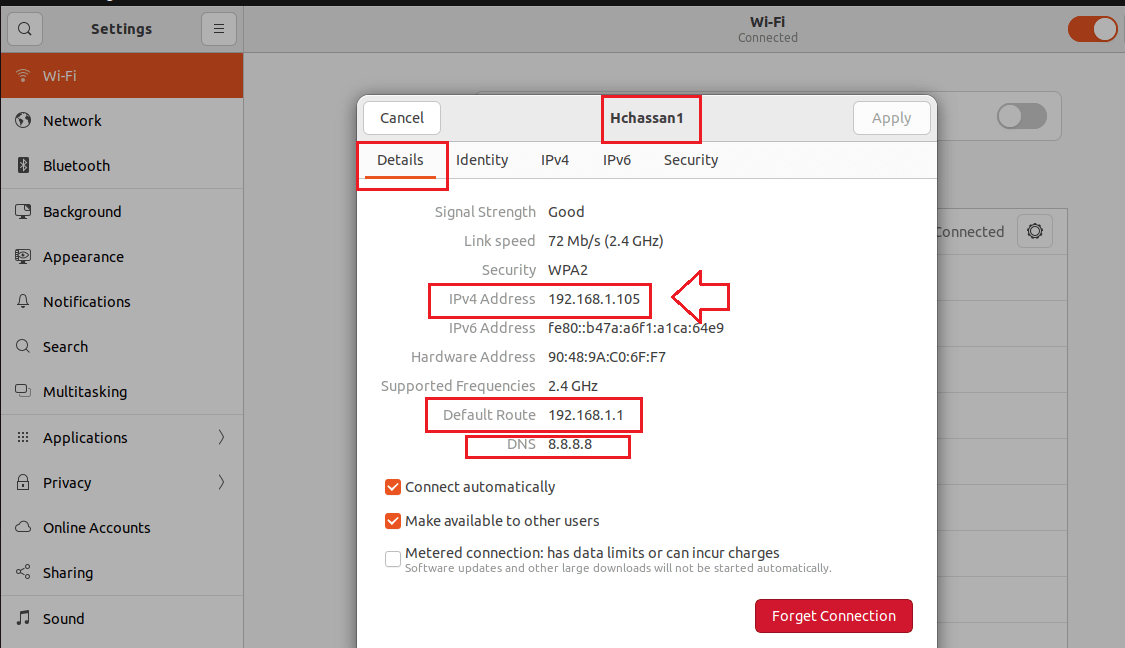
This should confirm that the static IP address has been successfully assigned to the Ubuntu operating system.
2. Set Ubuntu Static IP Using Nmcli
To set the static IP address on Ubuntu Server using the nmcli command, which is a command-line tool for configuring network settings.
1. First, open the terminal and run the following command to identify the network name, network type, and device name:
$ nmcli connection show

After executing the network command, you should see the output which includes the network name, UUID, network type, and device name.
In the case of the above figure, the network name is “Wired connection 1“, the UUID is “0fb27c8a-2e77-31c6-b212-2b3daa5e47e6“, the network type is “ethernet“, and the device name is “ens33“.
Note: If the nmcli command is not working on your Ubuntu system, you can install it by running the following apt command in the terminal:
$ sudo apt install network-manager
2. Now assign a static IP address to the “ens33” device, you can use the nmcli command-line tool with the following command:
$ sudo nmcli con add type ethernet con-name 'static-ip' ifname ens33 ipv4.method manual ipv4.addresses 192.168.157.128/24 gw4 192.168.157.2

The above command creates a new network connection named “static-ip” of type ethernet and sets the interface name to “ens33“. It then configures the IPv4 method to the manual and sets the IP address to 192.168.157.128 with a netmask of 24. It also sets the gateway to 192.168.157.2.
3. Then add the DNS IP to the static IP connection by using the “nmcli con mod” command followed by the name of the static IP connection (“static-ip“) and the “ipv4.dns” option with the IP address of the DNS server.
$ sudo nmcli con mod static-ip ipv4.dns 192.168.157.2
The above command tells Ubuntu to use the specified DNS server for resolving domain names into IP addresses. After execution of the command, DNS has been added with IP 192.168.157.2.
4. To confirm that the selected machine is using a static IP address, the following command can be used:
$ ip a
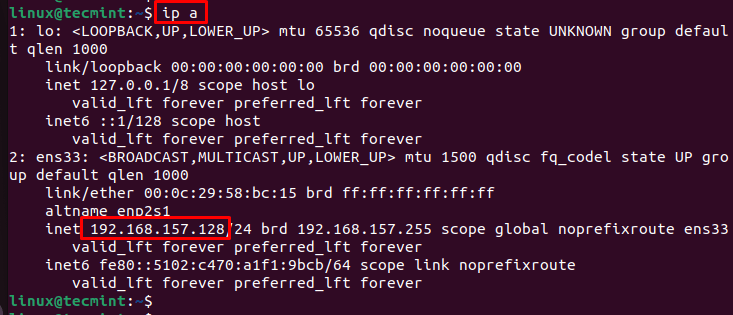
The command mentioned above can be used to verify whether a selected machine is using a static IP address or not. Upon executing the command, the static IP address, which was manually added to the Ubuntu under the device name ens33, will be displayed in the red highlighted box as 192.168.157.128.
5. To test the network connection, you can use the “ping” command followed by the IP address of a known reachable network resource. For example, to test the connection to the Google server, you can run the following command:
$ ping google.com
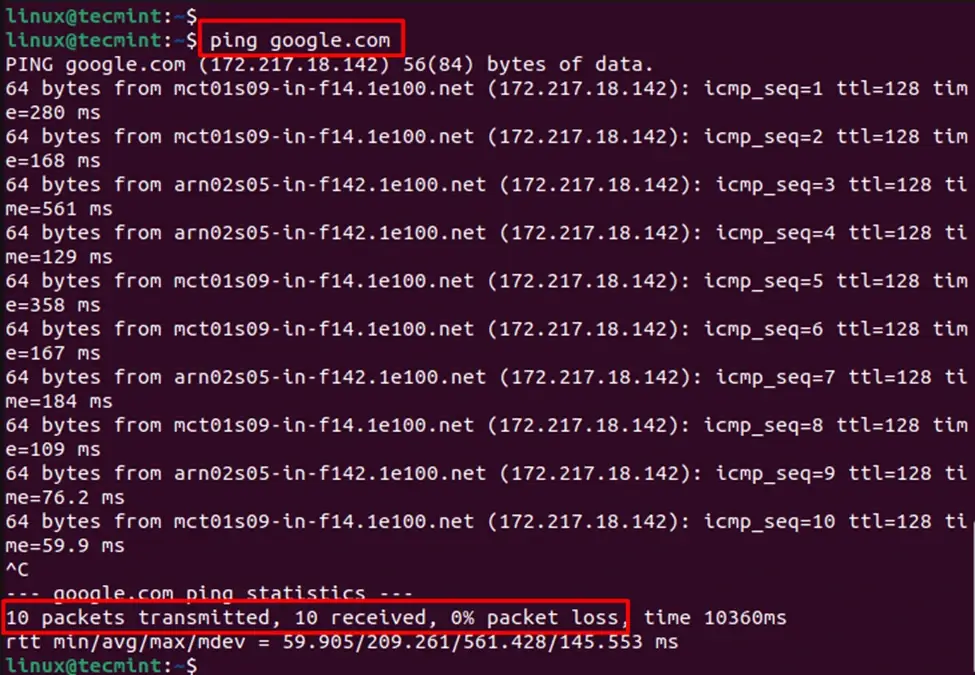
The displayed figure indicates that the internet connection is operating correctly, having transmitted ten packets and received them successfully. Consequently, the packet loss is 0%, and the highlighted box shows a duration of 10360 milliseconds.
3. Configure Ubuntu Static IP Using Netplan
Netplan is a network configuration utility used to manage the network interfaces on Ubuntu, which provides a YAML-based configuration file to configure the network interfaces and set the IP address, gateway, and DNS servers.
1. Before configuring the IP address, we need to identify the network interface name. We can use the following command to list all the network interfaces:
$ ip link show
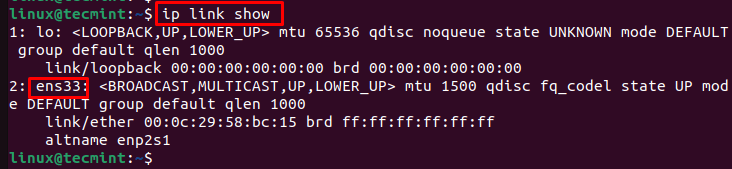
This shows a list of all the network interfaces available on the system, along with their names. Note the name of the interface that you want to configure.
2. In order to set up a static IP address on Ubuntu, we need to create a Netplan configuration file in the /etc/netplan/ directory with a .yaml extension as shown:
$ sudo nano /etc/netplan/01-network-manager-all.yaml
3. In the configuration file, we can set the IP address, subnet mask, and gateway as shown:
network:
  version: 2
  renderer: NetworkManager
  ethernets:
    ens3:
      dhcp4: no
      addresses: [192.168.157.128/24]
      gateway4: 192.168.157.2
      nameservers:
        addresses: [8.8.8.8, 8.8.4.4]
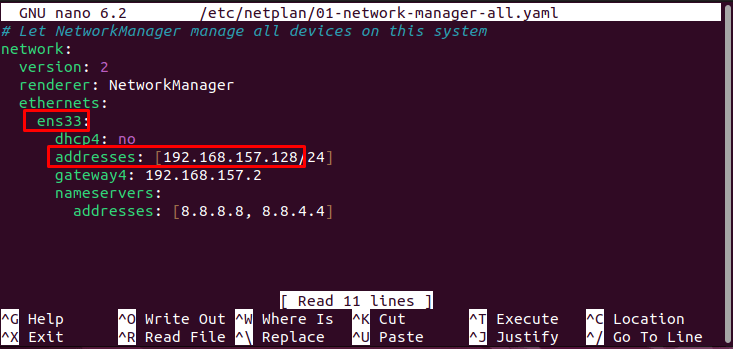
By configuring the IP address of the interface ens33 to 192.168.157.128 with a subnet mask of 24, and setting the default gateway to 192.168.157.2 and DNS servers to 8.8.8.8 and 8.8.4.4.
We are ensuring that the device has a fixed and reliable network connection. This configuration will allow administrators to manage the device more easily and ensure that it is always accessible using the assigned IP address.
4. Once the configuration file is created, we need to apply the changes using the following command:
$ sudo netplan apply
5. To verify that the static IP address is configured correctly, use the following command to check the IP address of the interface:
$ ip addr show
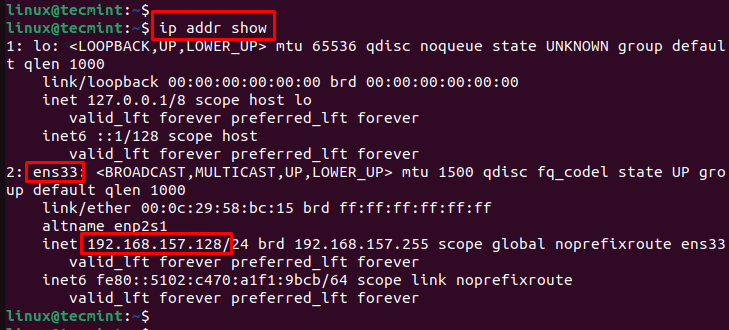
This displays the IP address and network configuration of all the interfaces. We should see the new static IP address assigned to the interface that we configured.
Conclusion
A static IP address is essential for network administrators and tech-savvy people. It remains fixed and easier to manage, unlike a dynamic IP address that changes every time a device connects to the network.
This blog post provides three methods to set a static IP address in Ubuntu. The GUI method involves checking Wi-Fi settings and assigning IP details, while the CLI methods use the nmcli and netplan commands to assign a static IP address to a particular device.
Whether you prefer a graphical or command-line interface, our step-by-step guide will help you configure your Ubuntu system to use a static IP address in no time.