Are you looking for a guide to install Yarn in Ubuntu? If yes, then you have landed in the right place. This guide contains three different methods to install the Yarn in Ubuntu.
Before we begin with the installation, it is important to understand what Yarn is and why we should use it. If you already know, feel free to skip this part.
What is Yarn?
Yarn is like a superhero for JavaScript developers. It helps them manage all the extra stuff their projects need to work properly. You know, those external libraries or modules that make our code even more awesome? Yarn takes care of them.
So basically, Yarn is a package manager used for JavaScript projects which were created by Facebook to work fast, secure, and reliable.
Why Should You Use Yarn as a Package Manager
The coolest feature about Yarn is the main reason behind using it as a package manager. It figures out exactly which versions of libraries we need for our project. It does this by using a special file called “yarn.lock” that keeps everything in order.
Yarn can also download and install multiple libraries simultaneously, which saves us a ton of waiting around. Additionally, it can even work without an internet connection if we’ve already downloaded the libraries before. That’s super handy when we’re on the go!
Oh, and there’s this cool feature called workspaces. which helps us manage multiple packages in one big project. So if we’re working on something huge, Yarn keeps everything organized and ensures all the packages work nicely together.
Yarn offers numerous other useful features, to learn about them refer to its official documentation. But for now, let’s directly move to the installation process.
Install Yarn on Ubuntu
The procedure to install Yarn on Ubuntu is pretty easy and can be installed using the following mentioned methods:
1. Install Yarn Using NPM
Let’s discover the process of installing Yarn in Ubuntu by utilizing NPM (Node Package Manager). However, it is recommended to run the “apt update” command before any installation to update the local package cache:
$ sudo apt update
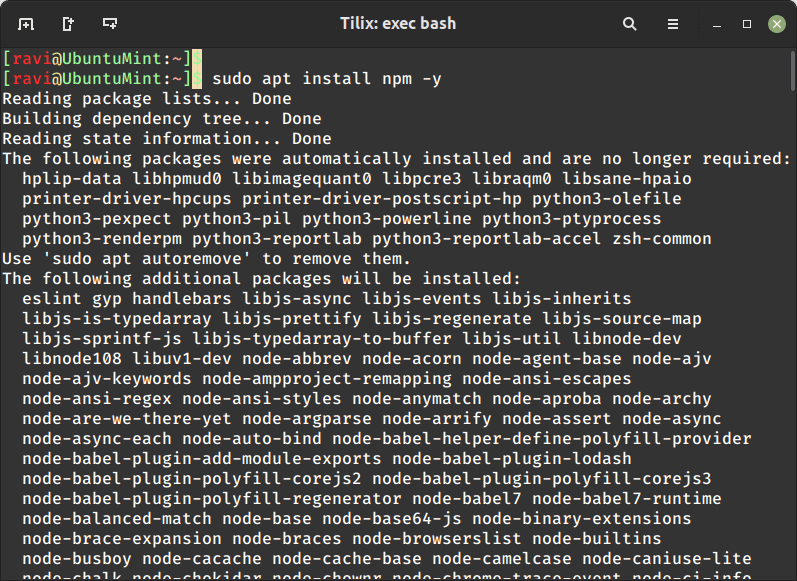
Once the system is updated, its time to install NPM itself by executing the given command in the terminal:
$ sudo apt install npm -y
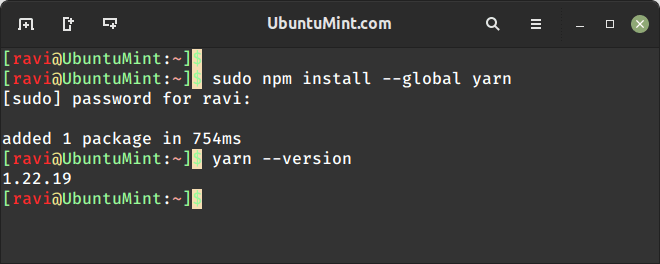
Now that the NPM is installed in Ubuntu, we can run the provided command to install the Yarn globally in our system by utilizing NPM:
$ sudo npm install --global yarn
As the Yarn is installed successfully, you can verify the version number of the installed Yarn by using the command stated below:
$ yarn --version
2. Install Yarn Using Corepack
In this method, we will install the Yarn by using the Corepack, a tool that helps manage multiple versions of package managers. Corepack is a new binary bundled with Node releases 16.10 and above.
Moreover, the official website of Yarn also recommends managing Yarn via Corepack.
Note: Corepack acts as an intermediary between the user and Yarn.
Let’s begin the installation process by first executing the update command:
$ sudo apt update
Next, we will install “snapd” (Snap package manager) to get the latest version of the node as the Corepack is bundled with it.
$ sudo apt install snapd -y
Once the snap package manager is installed, execute the following command to install the node in Ubuntu:
$ sudo snap install node --classic
After the installation of the node, install Corepack globally in Ubuntu with the help of the listed command:
$ sudo npm i -g corepack
Let’s breakdown the above command:
“i”represents install whereas the“-g”represents the global flag in the command.- The above command will install Corepack which is embedded with the installed node by using the npm package.
Once the Corepack is installed you will be able to manage multiple versions of other package managers by using it.
Finally, it’s time to install the stable version of Yarn using Corepack and activate it as the package manager for your project by executing the given command:
$ corepack prepare yarn@stable --activate
The stable version of Yarn will be installed and activated successfully. You can even check the installed Yarn version number by executing the stated command:
$ yarn -v
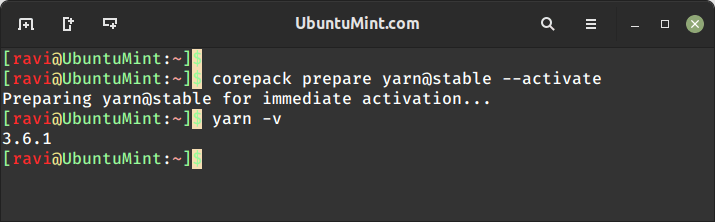
Please note that the version number may vary. “Yarn 3.6.1” is the most recent stable version number of yarn at the time of writing this blog.
3. Install Yarn Using Repository
In this last, but not least method, let’s cover the process of installing Yarn from its official repository.
We will need curl command to extract the GPG key, so let’s execute the command below to update the local repository cache and install curl in our system:
$ sudo apt update && sudo apt install curl -y
Moving forward let’s download the GPG key from the Yarn’s official website and add it to the system’s keyring by running this command:
$ curl -sS https://dl.yarnpkg.com/debian/pubkey.gpg | sudo apt-key add
After adding the GPG key, it’s time to configure the Yarn repository by adding the repository URL to a file named “yarn.list” in the “/etc/apt/sources.list.d/” directory:
$ echo "deb https://dl.yarnpkg.com/debian/ stable main" | sudo tee /etc/apt/sources.list.d/yarn.list
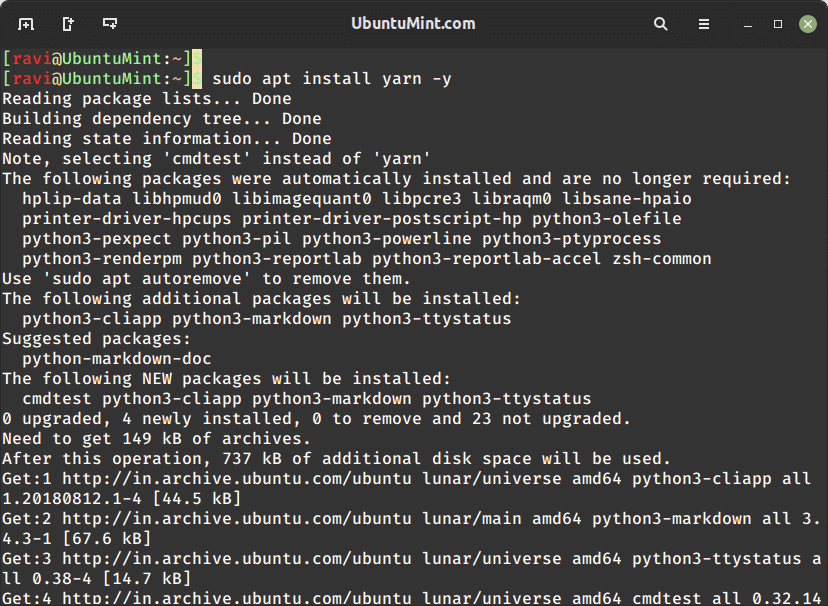
Finally, execute the command given below to install Yarn using the apt package manager:
$ sudo apt install yarn -y
Upon the successful installation of Yarn, you can run the command to know the version number of installed Yarn:
$ yarn --version

3.6.1
Now you can enjoy the benefits of Yarn during your coding journey.
Usage of Yarn in Ubuntu
Let’s cover some useful commands that will aid you while working with Yarn.
Upgrade Yarn in Ubuntu
If you want to upgrade the version of Yarn, execute the following command in your terminal:
$ sudo npm upgrade --global Yarn
Manage Project Using Yarn
As you are now aware, you can use Yarn for managing the dependencies of your projects. Let’s see the process of creating a project and adding some dependencies to that project using Yarn.
Firstly, create a new directory “ubuntumint_project” and move to it by executing the command given below:
$ mkdir ~/ubuntumint_project && cd ~/ubuntumint_project
Once you are inside your directory, it’s time to initialize the project using the “yarn init” command:
$ yarn init ubuntumint_project
The terminal will prompt you to enter the details about your project.
Now, let’s add React package as the dependency of the project by using Yarn:
$ yarn add react
The “add” is a command within Yarn utilized to add new packages as dependencies in the project. It is notable that Yarn automatically resolves the compatible version numbers of the dependencies.
Additionally, you can use yarn command to upgrade the specific dependency version:
$ yarn upgrade react
To remove a specific dependency package utilize the “yarn remove” command:
$ yarn remove react
Remove Yarn from Ubuntu
Let’s see a simple command that can be used for deleting the Yarn from your Ubuntu:
$ sudo apt remove yarn -y
You can now use the power of Yarn to make your coding journey tension-free, without worrying about managing the dependencies.
Conclusion
Yarn is a robust package manager that aids JavaScript coders in easily managing their dependencies.
This guide has provided three comprehensive methods to install Yarn in Ubuntu. Additionally, you can refer to this article to learn about some useful commands for adding, upgrading, and removing a dependency from your project.