Sometimes, the goal is to not only access the terminal of a server from another machine but to gain full control over the server’s graphical desktop environment remotely. In such a scenario, you should use a VNC server.
VNC (an acronym for “Virtual Network Computing”) is a technology that operates via a client/server model and enables users to remotely share and access a graphical desktop environment.
VNC Server is a multiplatform software that is installed on the system that needs to be accessed remotely from any machine (client). The VNC Client can then control the server through the shared graphical desktop environment, which is similar to XRDP functionality.
People often think that setting up an entire VNC server is a challenging task. However, that’s not entirely true.
To set up a VNC server, all you have to do is stick through this guide and implement the provided solution. After enabling the server, you will learn how to access it from Windows (client machine).
Install a VNC Server on Ubuntu
Let’s begin the process of installing a VNC server on your Ubuntu. But before that, execute the given apt command to update the package index and upgrade already installed packages:
$ sudo apt update && sudo apt upgrade -y
By default, the Ubuntu server does not have a graphical desktop environment and it is primarily controlled via a command-line interface.
However, if you require a desktop for your server management, you can install an Ubuntu desktop environment along with the required dependencies as shown.
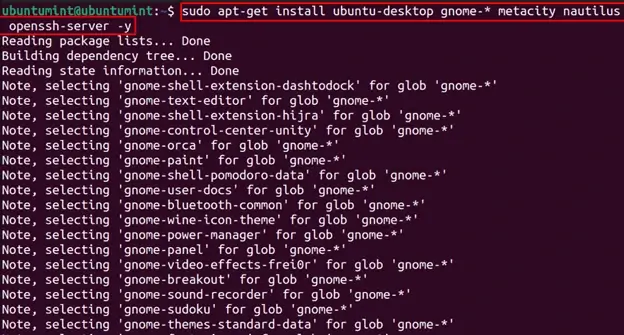
$ sudo apt-get install ubuntu-desktop gnome-* metacity nautilus openssh-server -y
This command will install the Ubuntu desktop, GNOME components, Metacity window manager, Nautilus file manager, and the OpenSSH server package.
After installing the required dependencies and desktop environment, it’s time to install the VNC server. In Ubuntu, we can install any available VNC Server software including RealVNC, TigerVNC or TightVNC.
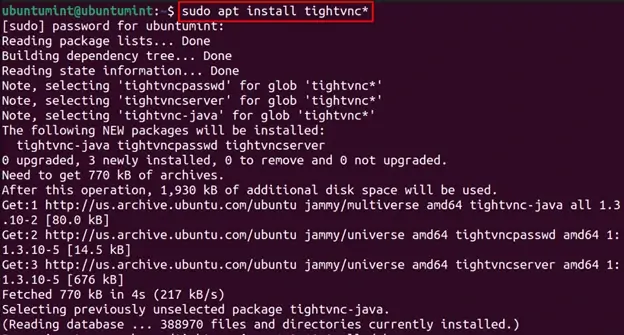
Let’s install TightVNC along with any dependency if required by executing the stated below:
$ sudo apt install tightvnc*
Note: The TightVNC Server software is open-source and best known for efficient bandwidth usage.
Now that the TightVNC server is installed, we have to start it by executing the command given below:
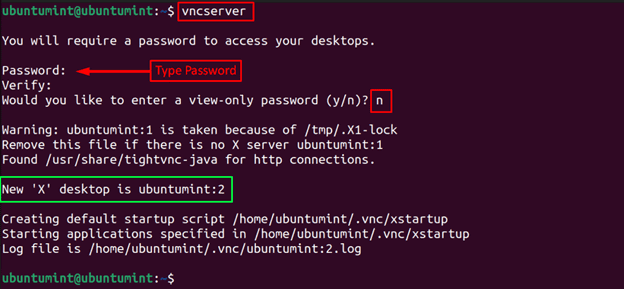
$ vncserver
The terminal will prompt you to define a new password, make sure to set a strong password (length between 6 to 8 characters).
After setting the password, the terminal will prompt you to set a view-only password for the server, which is not required in our case since we want to give full access to the server’s desktop environment. Therefore, type “n”.
After that, the terminal will display a message conveying information about your new server instance launched on port “5901” and assign it a display number for easy remembrance. In our case, it’s “2”.
We can launch multiple instances, which will be then launched on port “5902” with the display number “3” and so on.
Now that the VNC server is installed and a server instance is started, let’s configure it.
Configure a VNC Server on Ubuntu
To configure the VNC server first, we have to terminate the currently running server instance process by executing the command:
$ vncserver -kill :2
Note: Replace “2” with your display port number in case of any change.
Now before making any changes to the configuration file of the VNC server, let’s make a backup file by utilizing the provided cp command:
$ cp ~/.vnc/xstartup ~/.vnc/xstartup.old
Let’s open the configuration file named “xstartup” of the VNC server by using the nano editor:
$ nano ~/.vnc/xstartup
In the file, you can simply copy and paste the code given below to modify the configuration for the VNC server startup:
#!/bin/sh
[ -x /etc/vnc/xstartup ] && exec /etc/vnc/xstartup
[ -r $HOME/.Xresources ] && xrdb $HOME/.Xresources
xsetroot -solid grey
x-window-manager &
gnome-session &
gnome-panel &
gnome-settings-daemon &
metacity &
nautilus &
This code will aid in modifying the startup behavior of your VNC server to match the installed desktop environment settings and applications. The above code will:
- Execute the “/etc/vnc/xstartup” script.
- Load the X resources.
- Set the root window background color as grey.
- Start all the required components of the GNOME desktop environment.
After making changes to the file, make sure to save it and exit the file by pressing the “CTRL + O” keys.
Now we have to change the permission of the “xstartup” file by using the chmod command as an executable:
$ chmod +x ~/.vnc/xstartup
The next step is to modify the configuration file for TightVNC Server, to do so open it with the help of the nano editor:
$ nano ~/.vnc/tightvncserver.conf
In this configuration file, add your desired geometry and color depth for the TightVNC Server:
$geometry = "1360x768";
$depth = 24;
After making the changes save and exit the TightVNC server configuration file.
Create Systemd VNC Service File
The next step is to set up VNC as a service so that we can start, stop, restart, and enable it with ease. We can do this by creating a systemd service file for our VNC server running at display port “2” as shown:
$ sudo nano /etc/systemd/system/[email protected]
Add the following code to your file, make sure to modify the “user” and “PIDFile” according to your username and directory:
[Unit]
Description=Remote desktop service (VNC)
After=syslog.target network.target

[Service]
Type=simple
User=ubuntumint
PAMName=login
PIDFile=/home/ubuntumint/.vnc/%H:%i.pid
ExecStartPre=/bin/sh -c '/usr/bin/vncserver -kill :%i > /dev/null 2>&1 || :'
ExecStart=/usr/bin/vncserver :%i
ExecStop=/usr/bin/vncserver -kill :%i

[Install]
WantedBy=multi-user.target
Save and exit the file.
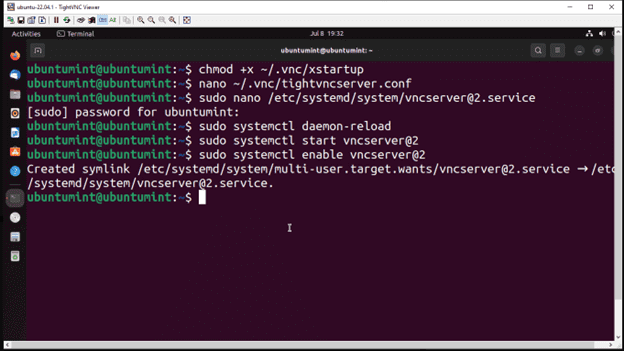
You have successfully set the VNC as a service. Now let’s execute the stated command to ensure that systemd recognizes the changes:
$ sudo systemctl daemon-reload
It’s time to finally start the VNC server instance at display port “2” by running the command:
$ sudo systemctl start vncserver@2
Also, run the command given below to enable the VNC server instance:
$ sudo systemctl enable vncserver@2
You have successfully enabled the VNC server on your Ubuntu machine which can be now easily accessed by any client machine. Let’s try to access this server by using a Windows machine.
Access Ubuntu Desktop from Windows
In Windows, you can use PuTTY, an open-source terminal emulator in conjunction with a VNC client to establish a secure tunnel and connect to a VNC server securely.
Connect to SSH Ubuntu with PuTTY
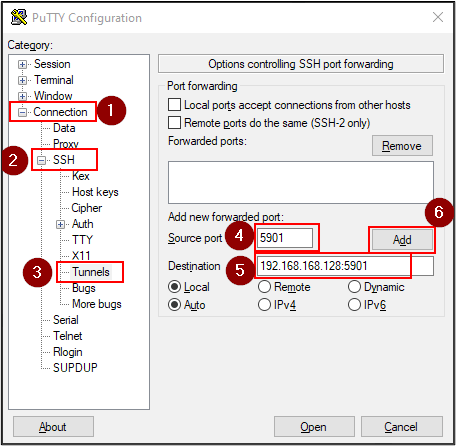
In PuTTY, click on the “+” sign for “Connection”, “SSH” and then the “Tunnels” option from the Category sidebar.
In the “Tunnels” configurations, type “Source port” as “5901” and “Destination” as “<IP address of Ubuntu>:<Port>”. Then, click on the “Add” button.
Note: If you are unaware of the IP address of Ubuntu (VNC Server), don’t worry about it. Simply type the “ip a” command in the terminal of Ubuntu to get the IP address.
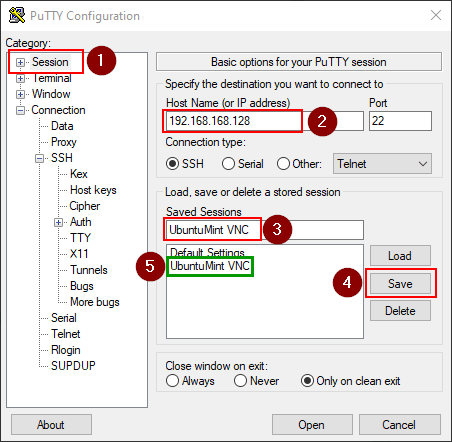
After doing the SSH tunnel configurations, click on the “Session” option for its configuration. In the Session configuration, provide the IP address of your Ubuntu and ensure that the connection type is “SSH” and the port (for SSH) is “22”. Enter the name for this session and click on the “Save” button. Finally, click on the session name to open it.
A prompt will appear, click on the “Accept” key. PuTTY will connect to the Ubuntu machine successfully using SSH.
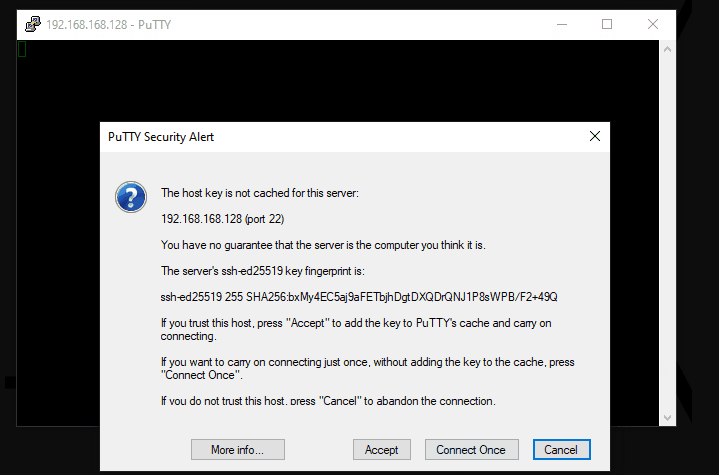
We have successfully performed SSH tunneling and are now connected to the Ubuntu machine.

Connect to Ubuntu Desktop with TightVNC
It’s time to install the VNC client, “TightVNC” and gain control of the VNC server’s desktop environment.
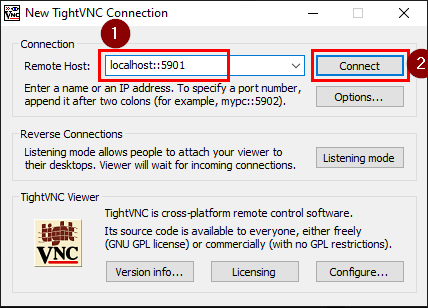
Once it is installed, open TightVNC, type “localhost::5901” and click on the “Connect” button.
Provide the password of the VNC server when prompted. You will successfully gain access to the desktop environment of your server.
Enjoy controlling the VNC server from your Windows.
Conclusion
By setting up a VNC server on Ubuntu, users can remotely access and control the server’s desktop environment using a VNC client machine. There are multiple VNC server software that can be used, such as TightVNC.
This guide offered a complete step-by-step solution for installing a VNC server and configuring it on Ubuntu. As well as it provided a method to access the VNC server using Windows.
I hope the journey of setting up the VNC server was easy for you. In case of any issue feel free to comment, see you next time with an interesting topic!